
Soundproofing does not exist... but Significant Sound Isolation can
Industry standards and some ways to achieve them
Sound isolation for a home theater is important for two reasons:
1) Don't disturb the neighbors! ie, sound getting out.
2) Don't disturb the movie! ie, sound getting in can distract from the movie experience, mask sounds in the sound track, make dialog hard to hear, etc.
This post contains details about "the standards" for isolation, and then notes collected from experts about ways to achieve those standards.
THE INDUSTRY STANDARDS
In 2023 the CTA and CEDIA published more nuanced guidelines to four levels of sound isolation in the CEDIA/CTA-RP22 document titled "Immersive Audio Design Recommended Practices" (available for free on the CEDIA web site). Here are key pieces of the standard, and their advice on construction considerations. Then, there follows the bulk of this post, which is a description for the DIYer about How to achieve many of the things described.
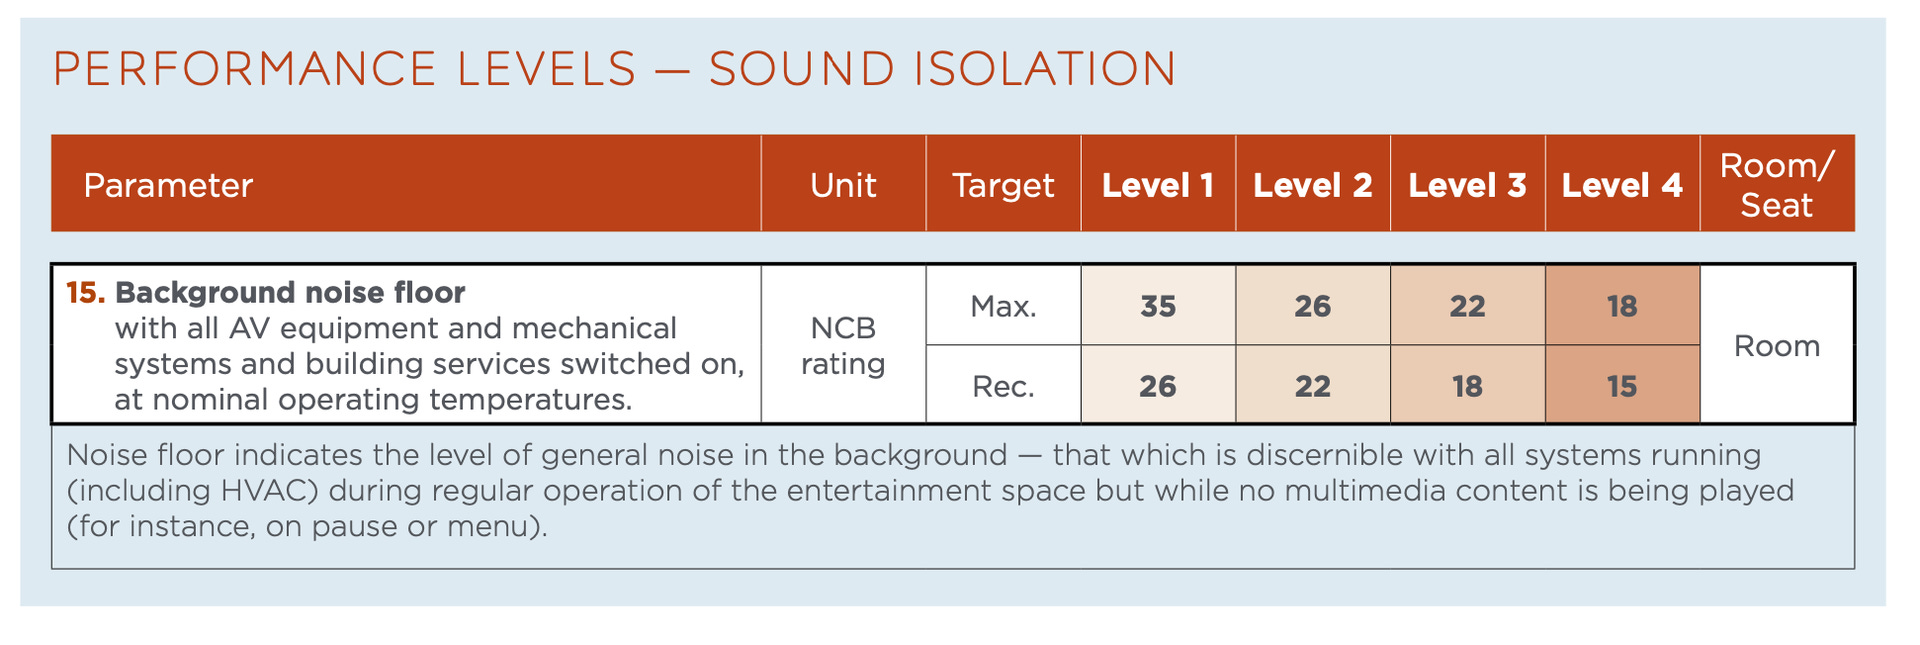
The levels are defined this way:

How does that compare with a "normal" room?
CONSTRUCTION TECHNIQUES
This video is a nice introduction to some common building techniques, just to give you a sense of what this sound isolation work is about.
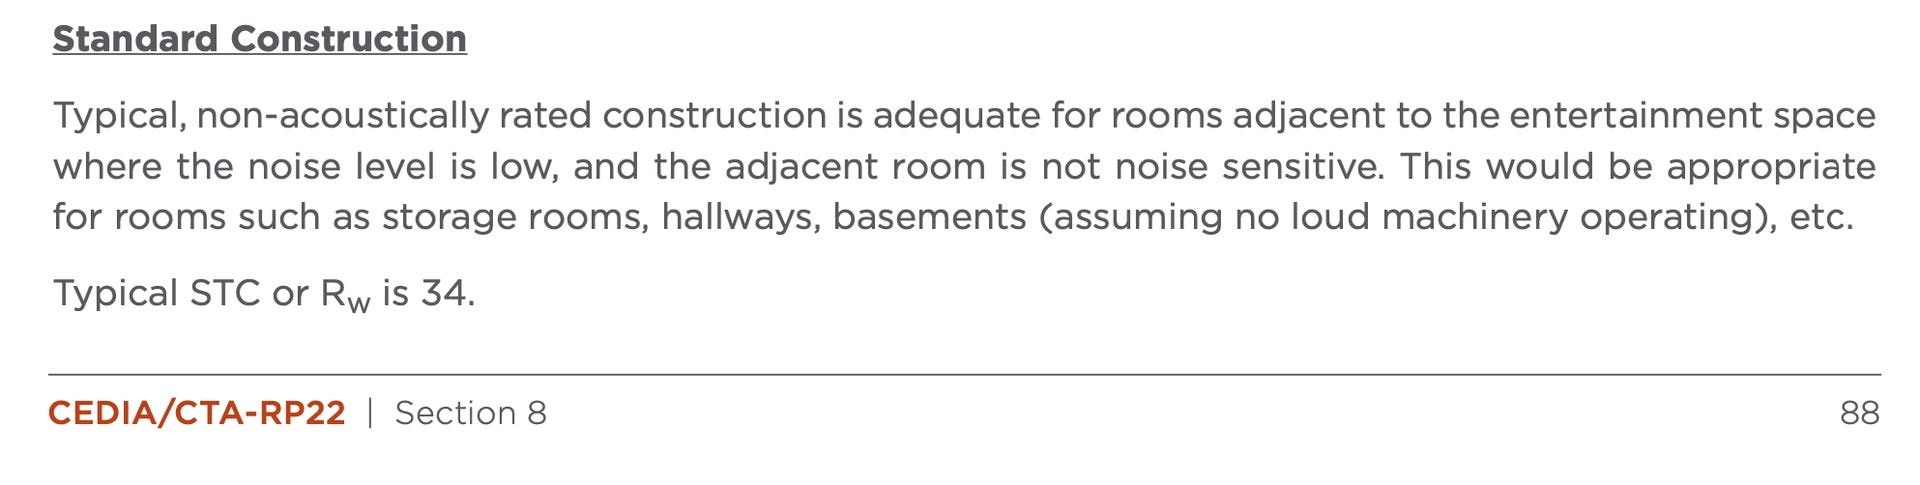
And the CEDIA document has some guidelines as well:
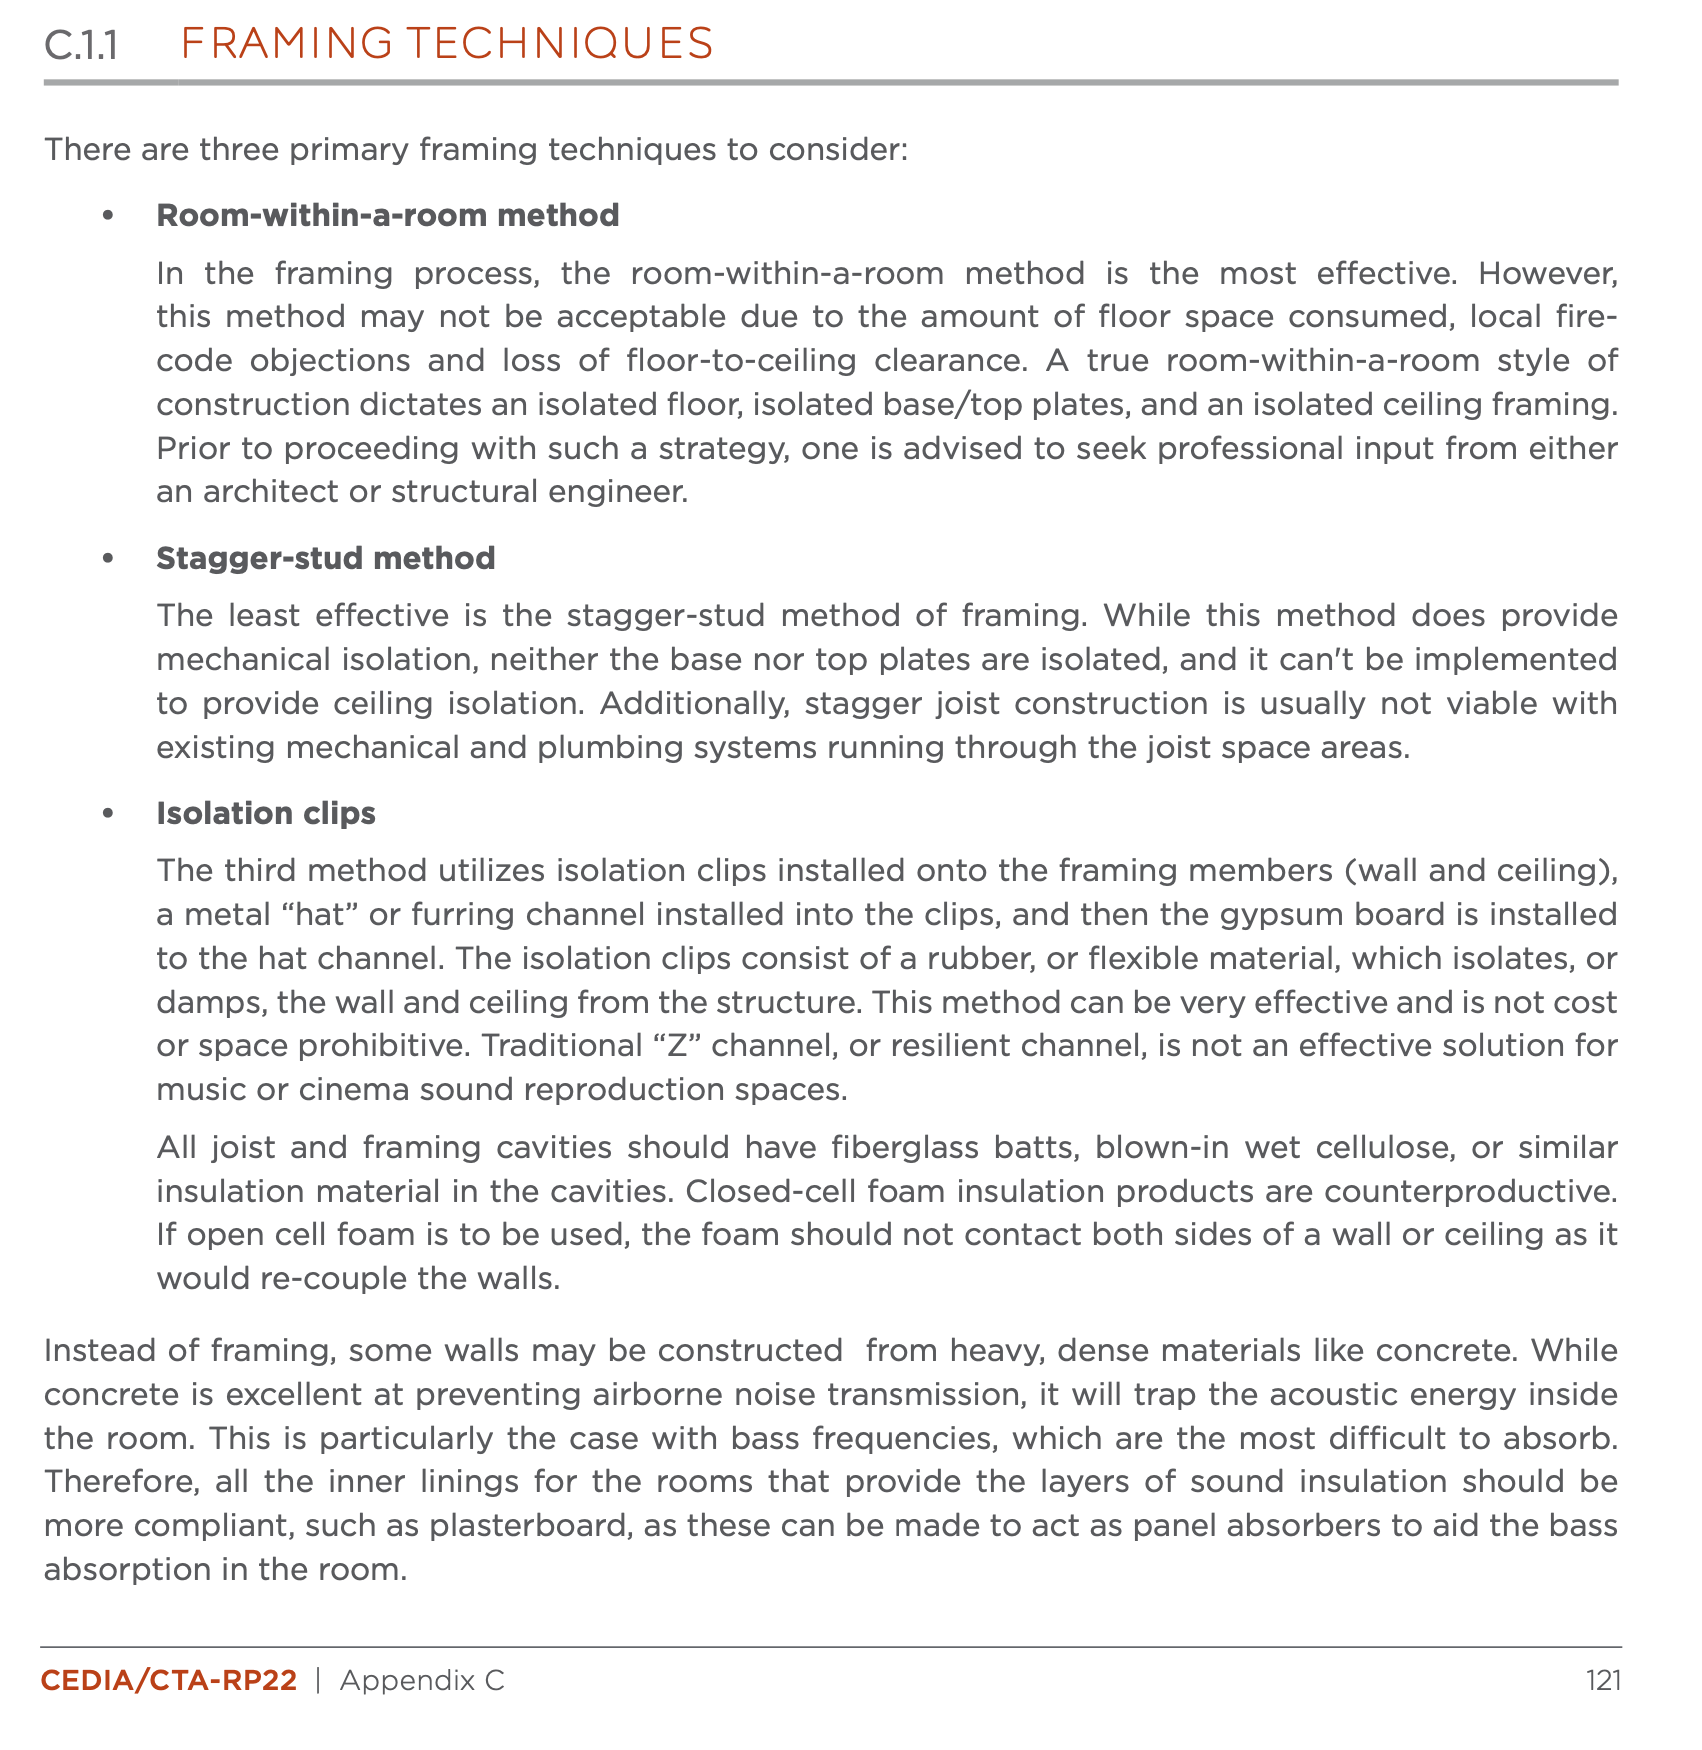
So, the gold standard, even if the building is stand alone because sound can come from anywhere outside is a room within a room -- where the walls and ceiling of the theater do not touch the walls and ceiling or any other part of the outside building. It's even possible to have the floor "float" but building onto a concrete slab is likely enough for many of us.
And that is a complex process, so I have collected many leading practices, below.
For the purposes of organization, I'll divide the details below into specific parts of the room but it is important to keep in mind that a room is only as good as the weakest link. Example: A "soundproof" wall can be almost completely undermined by a "normal" door.
WALLS
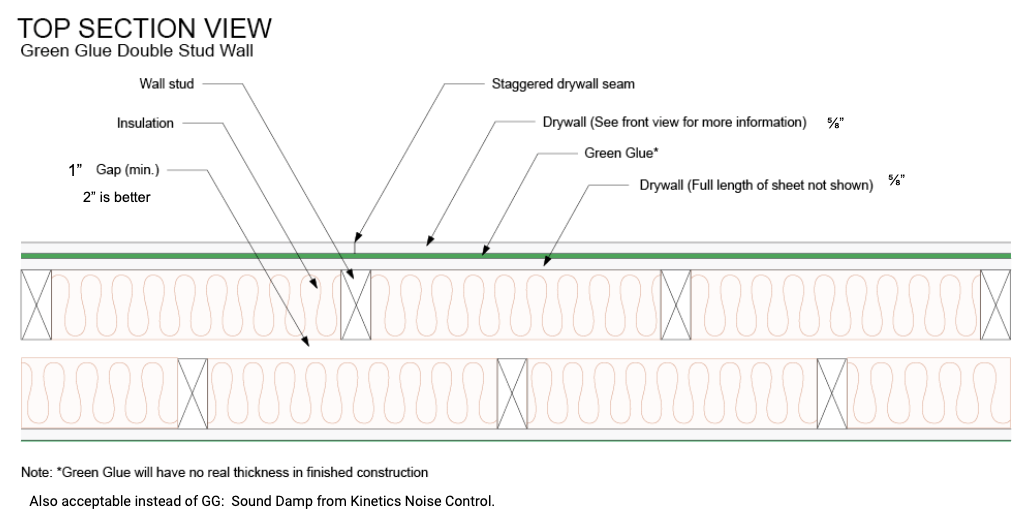
Here is what a complexly dual wall setup looks like.
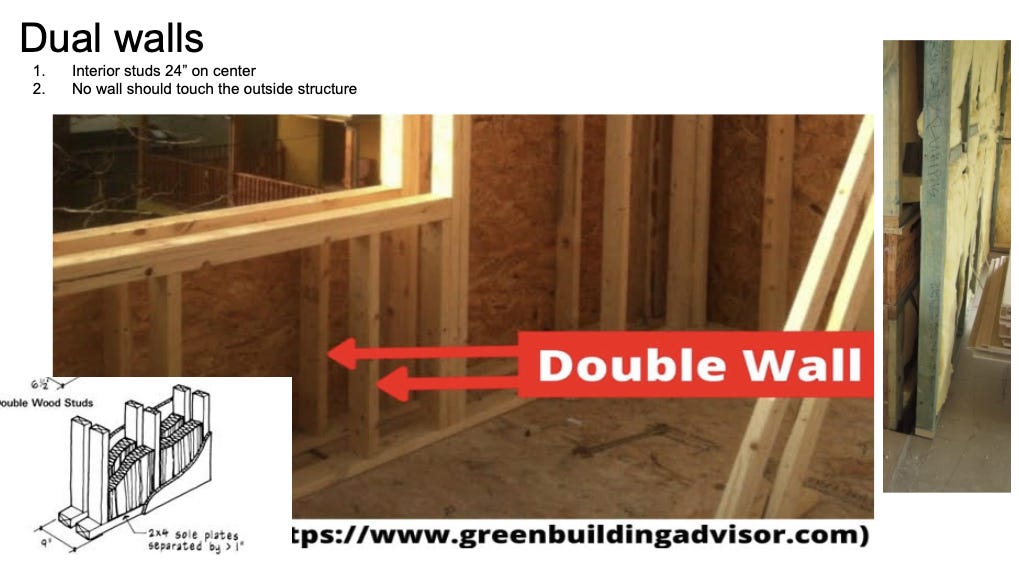
The soundproofing company web site shows the relative effectiveness and construction techniques of many of these approaches. Many of these photos are from their web site.
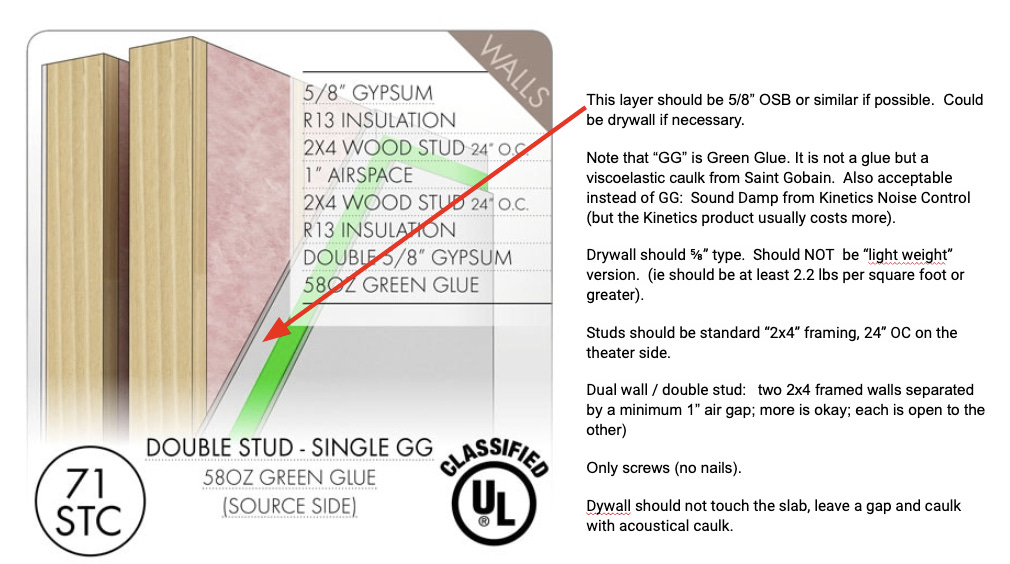
They have MANY other recipes on their web site. Check them out. But to continue with this "gold standard" approach of double stud walls, some additional details they provide are below:
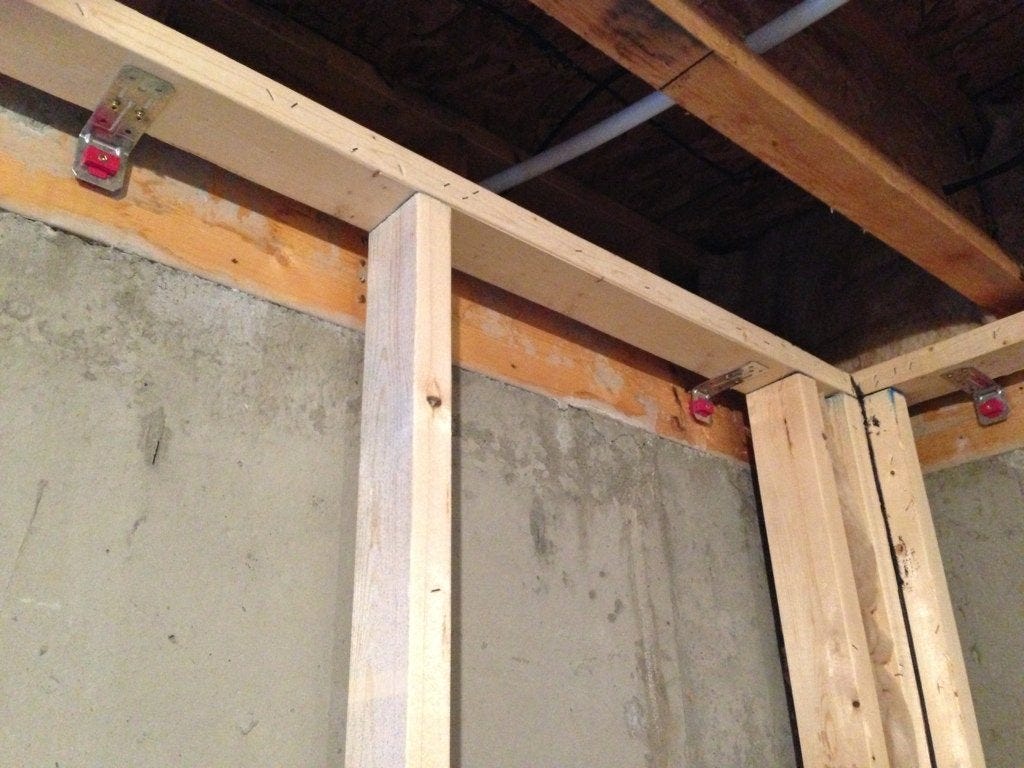
If you have concrete walls or need to loosely attach walls to the structure above, many folks consider "isolated framing."
Islolated framing, similar in concept to double walls and to clips/channels is a solution for where you have things like an existing concrete wall on some sides, or want to loosely use the external structure without rigid coupling. Jeff shared the following photos found "at random" on the internet, to illustrate this:
What if that stuff isn't feasible/desirable?
There are other, often quite effective, methods such as the popular and useful clips and hat channel approach.
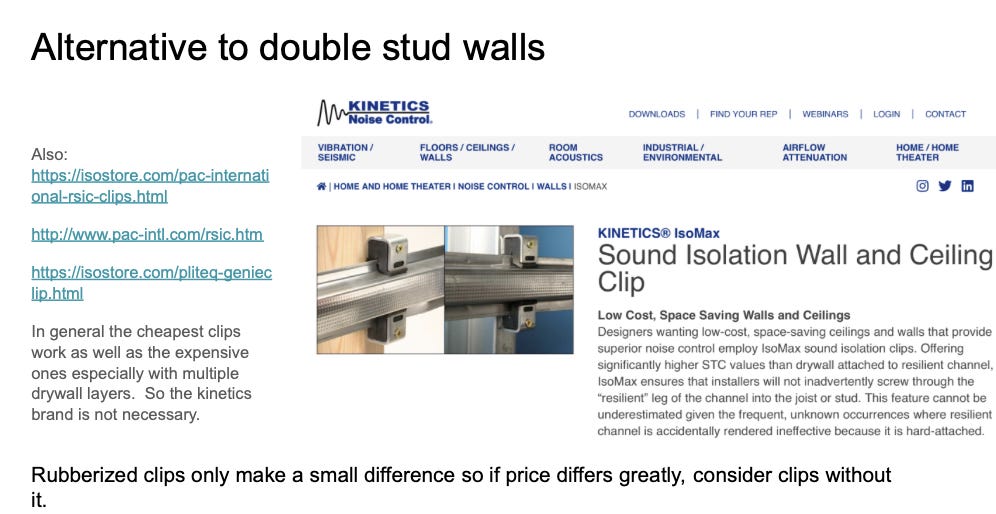
This can be useful when you want to lose as little space in the room as possible but still achieve good results. They require some attention to detail, for example, here are additional details for clips and channels based on the experiences of AVS members:
The clips are attached in a linear pattern perpendicular to the studs or joists and at a maximum distance of 48” on center. For walls, the bottom row should be no more than 2-inches from the floor, and 6-inches or closer to the ceiling. For ceilings, fasten the clips within 8-inches of the walls at the ends of each run of each channel.
The maximum separation between rows is 24-inches for one layer of 5/8” gypsum, and 16-inches for a double layer. A clip should fully support the ends of each row. This may vary by model and manufacturer so follow the specific instructions for the materials you are using as well as local building codes.
Secure the isolation clip following the manufacturer’s instructions. The clips are fastened to the wood with 2-1/2” Type W screws, or steel with 1-5/8” Type S screws. Do not use nails.
The hat channels should be a minimum of 25 gauge steel, between 7/8” and 1-1/2” deep and have a 1-1/4” crown to seat the drywall against. The channel is pinched into the clip and should be overlapped 6-inches midway between clips, and secured with screws or wire.
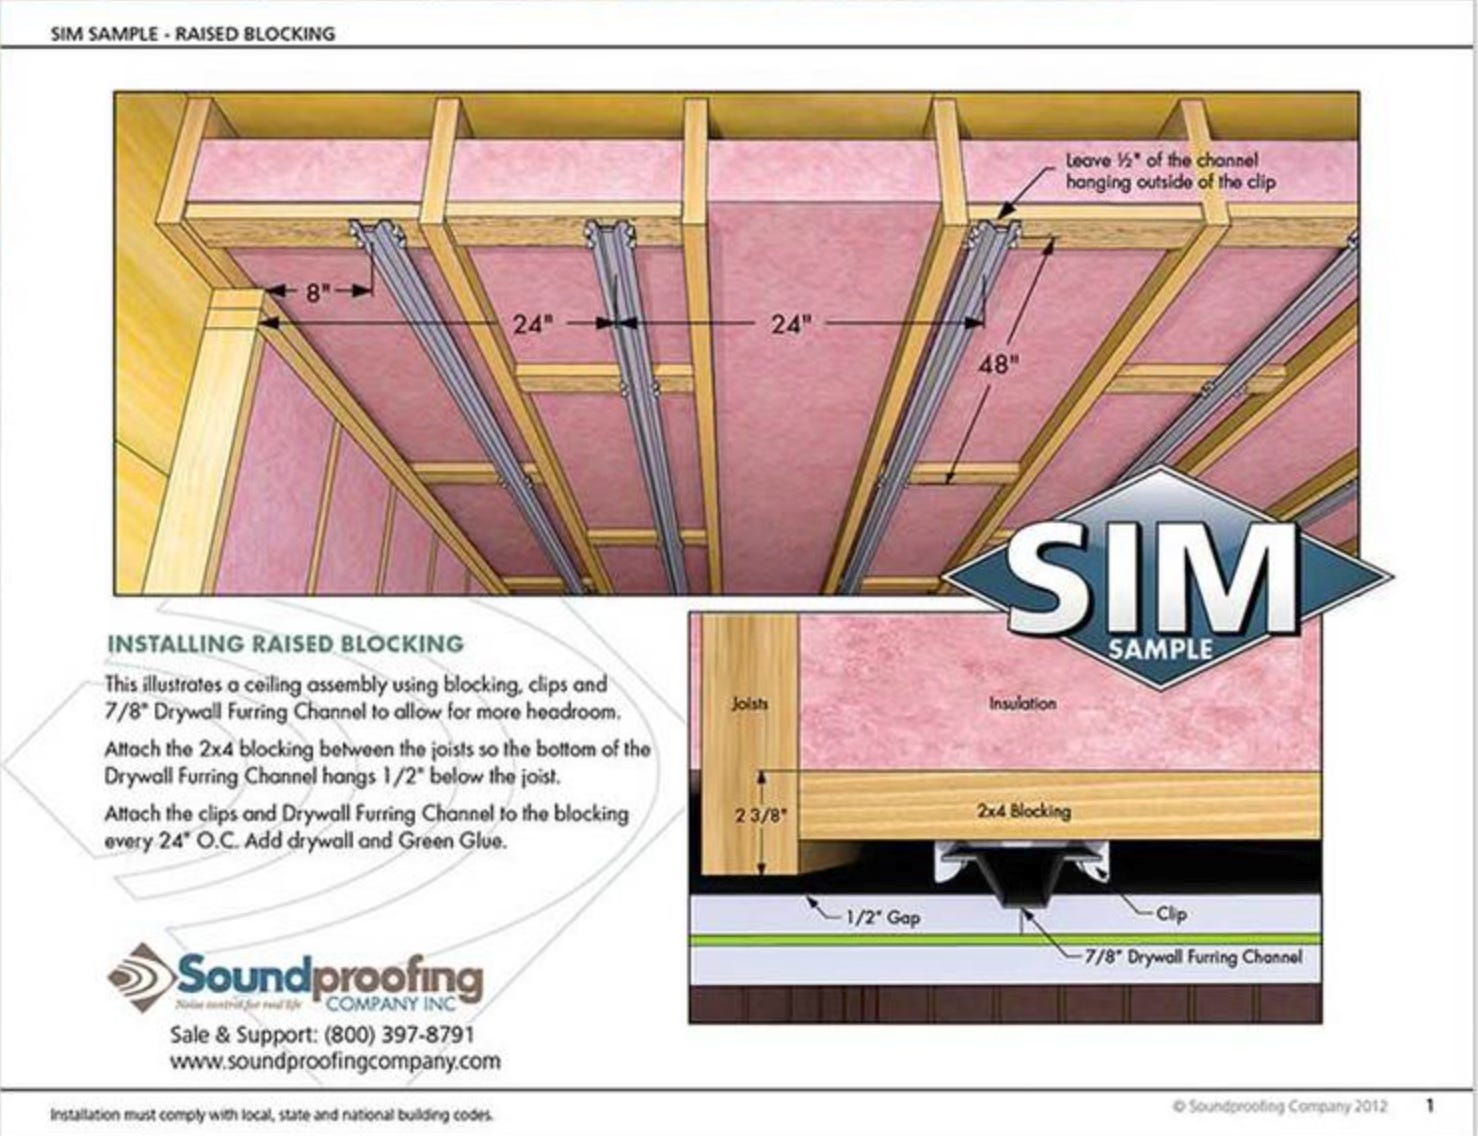
If you think you don’t have space for clips and channels, think again. You can likely do it with less than 1” of depth lost. HushFrame clips, or regulars clips and channels with blocking, can do the job just fine (with the added advantage of letting you put channel at 24” OC instead of 16” OC, increasing the decoupling effectiveness. See the images in the Ceilings section for details.
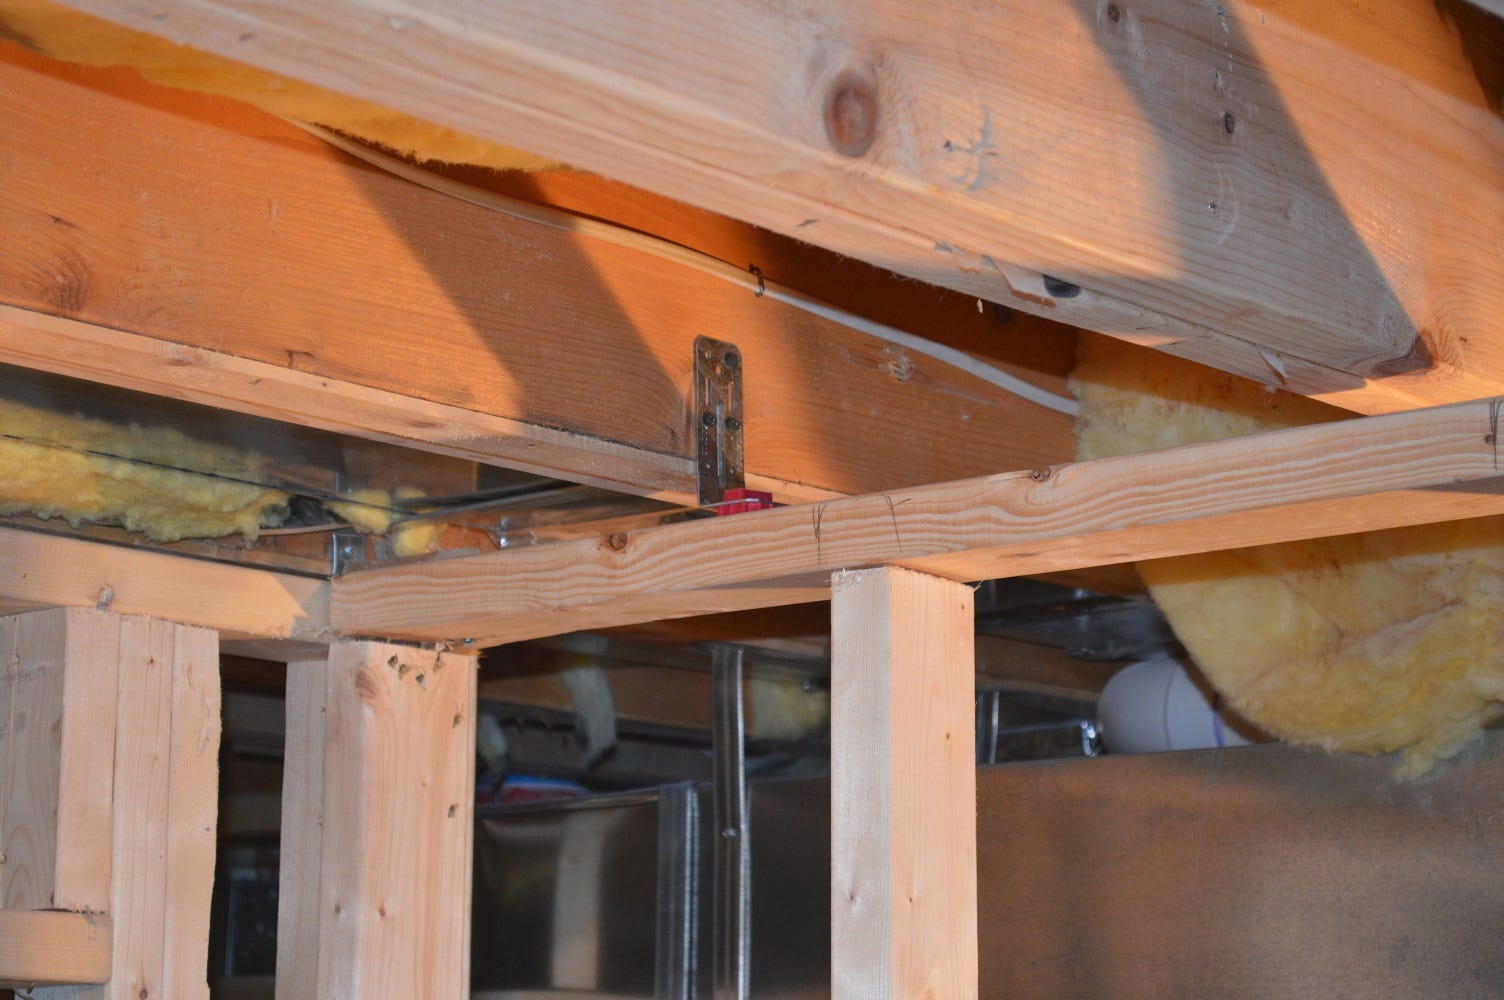
CEILINGS
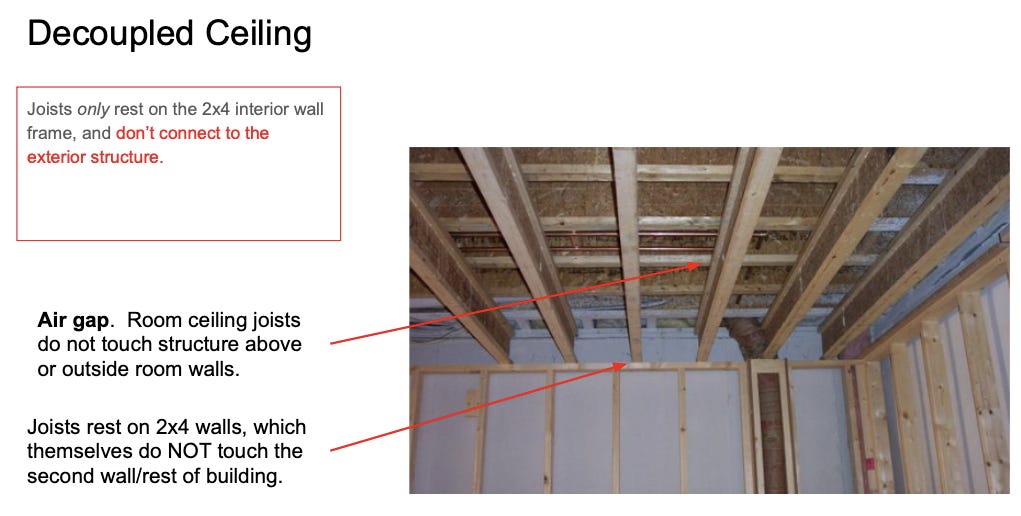
A decoupled ceiling resting on decoupled walls (with neither touching the building around it) is just about the highest level of decoupling in most scenarios.
But just like with walls, you can use clips and channels.
This can be useful when you want to lose as little space in the room as possible but still achieve good results. And there are even creative uses of isolation clips on a ceiling that lose you very little headroom:
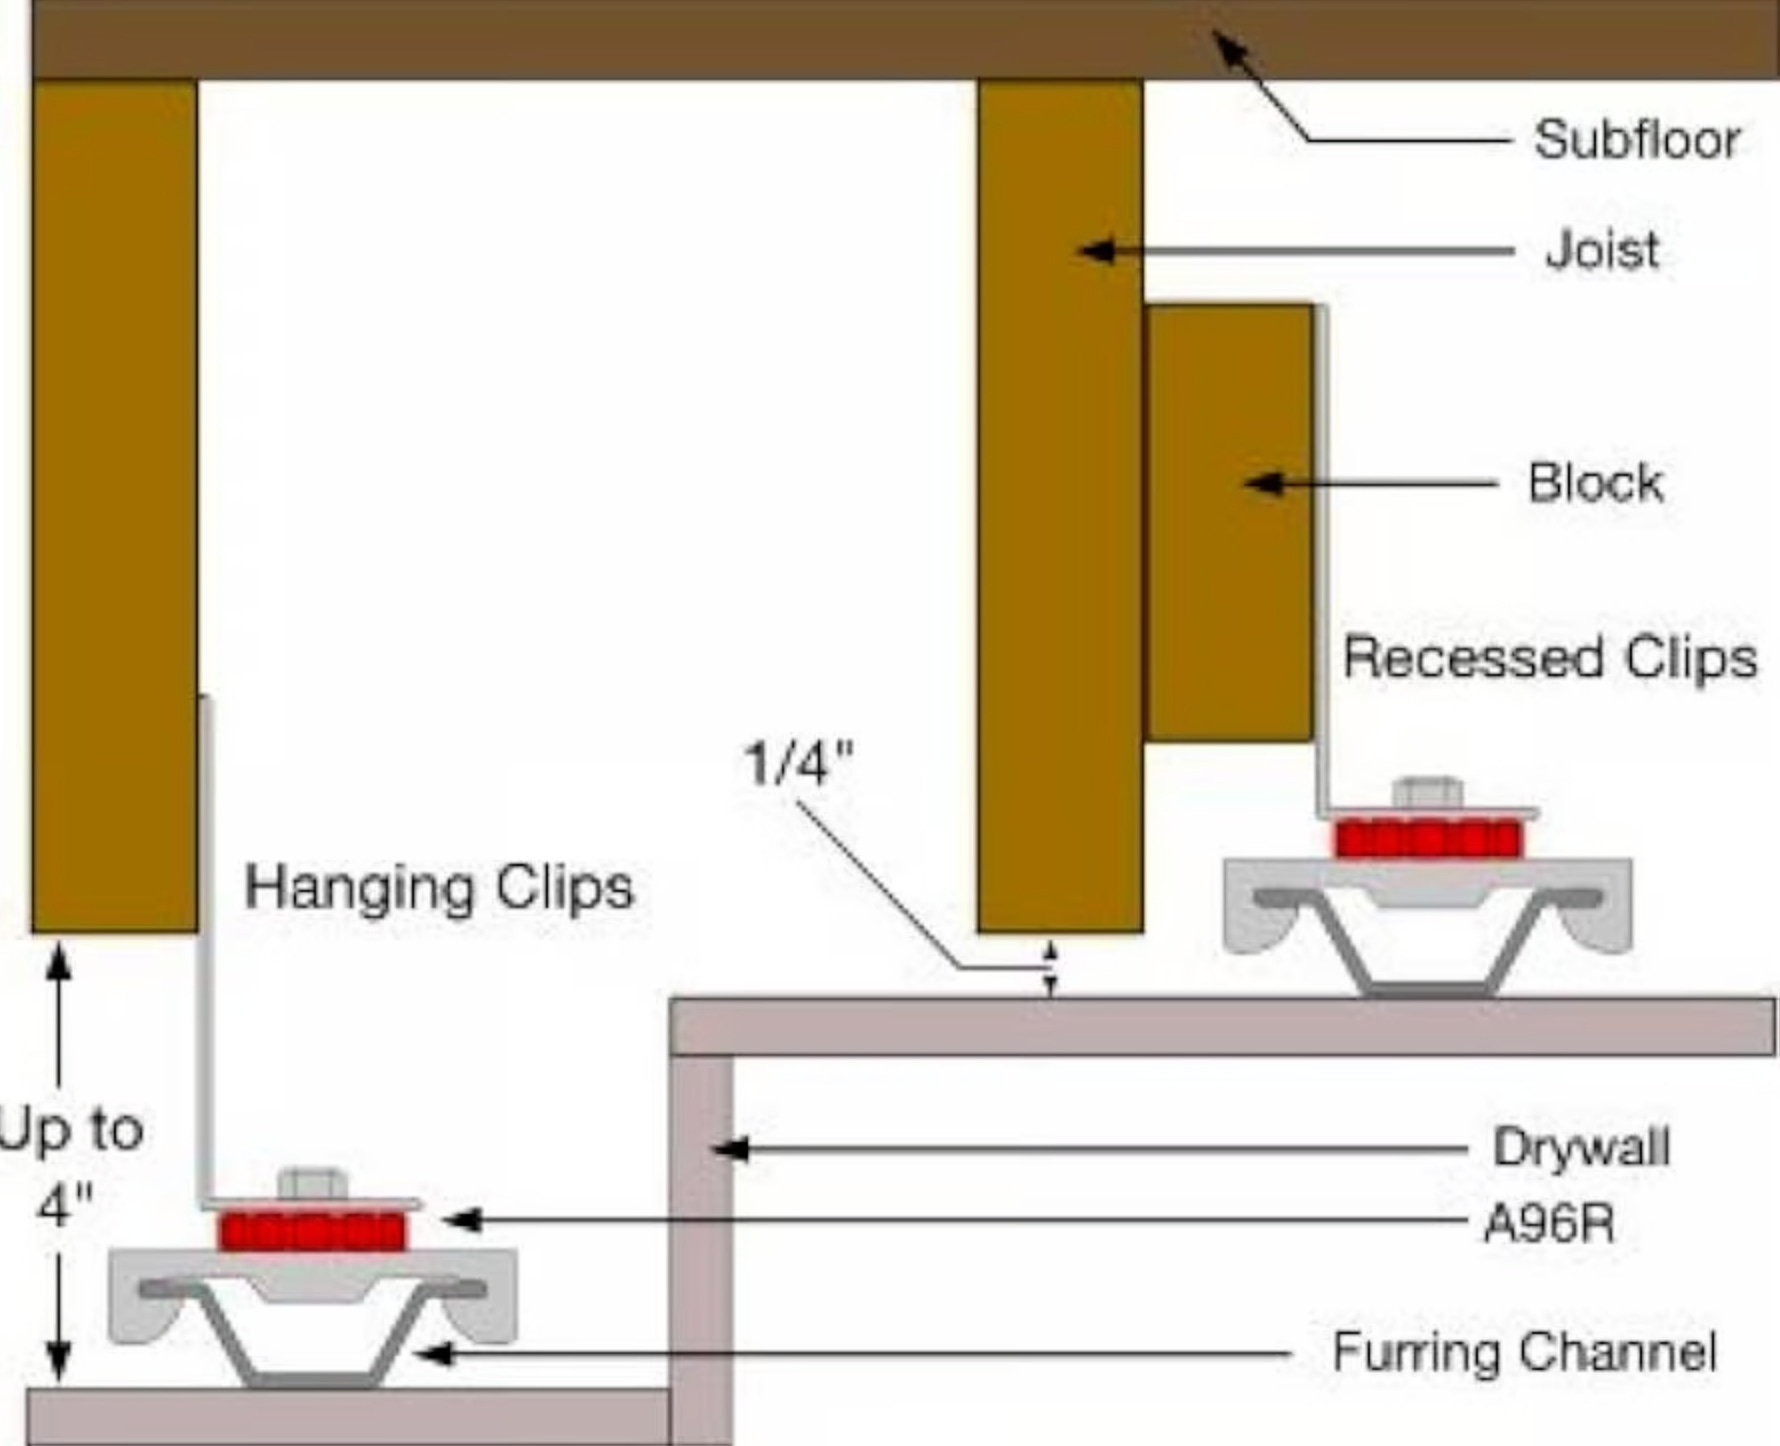
Or review this image and technique from the SoundProofing Company. Note how it lets you attach drywall at 24” OC intervals (even on 16” OC wall or ceiling framing) which helps improve isolation.
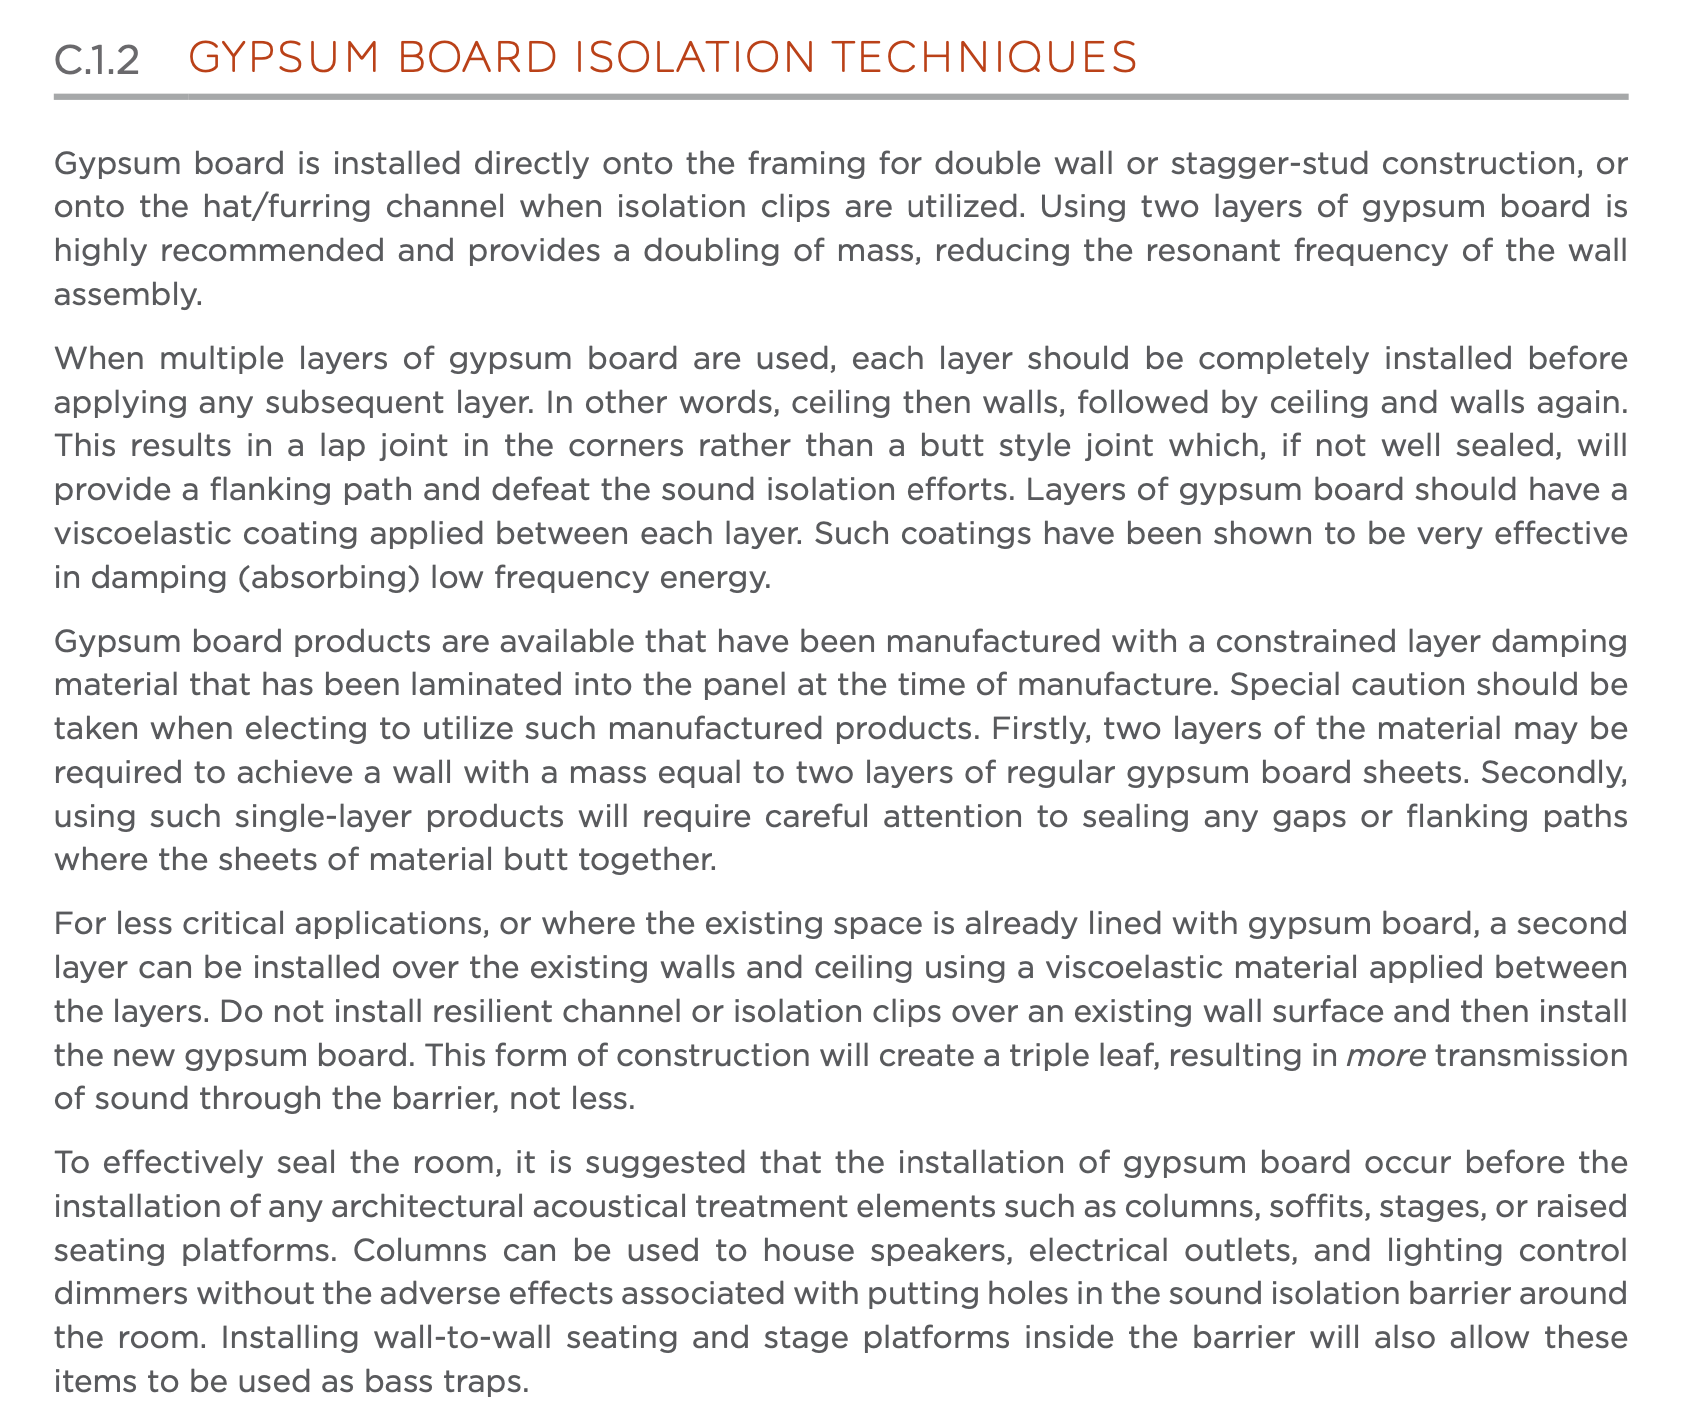
HANGING DRYWALL (GYPSUM PANELS)
Pay close attention to manufacturer instructions, and details on places like the SoundProofingCompany’s web site. Some best practices include:
When using channels, drywall panels are secured to the furring strips (channels) with S Type bugle head screws 1-1/8” for 1/2” gypsum, 1-1/4” for 5/8” sheets, or 1-5/8” screws for two layers of gypsum.
Whether on channels or on decoupled 2x4 walls, the gypsum panels should have a 1/4″ around their perimeter which should be filled with acoustic caulking, as should any electrical or ductwork through the drywall.
Careful about what you build inside this new shell: Sound isolation clips with hat channels and drywall provide an excellent sound barrier for insulated walls and ceilings. Unfortunately, attaching cabinets and bookshelves is not recommended, but lighter weight items like soffits are common.
And you'll have many other particulars to pay attention to.
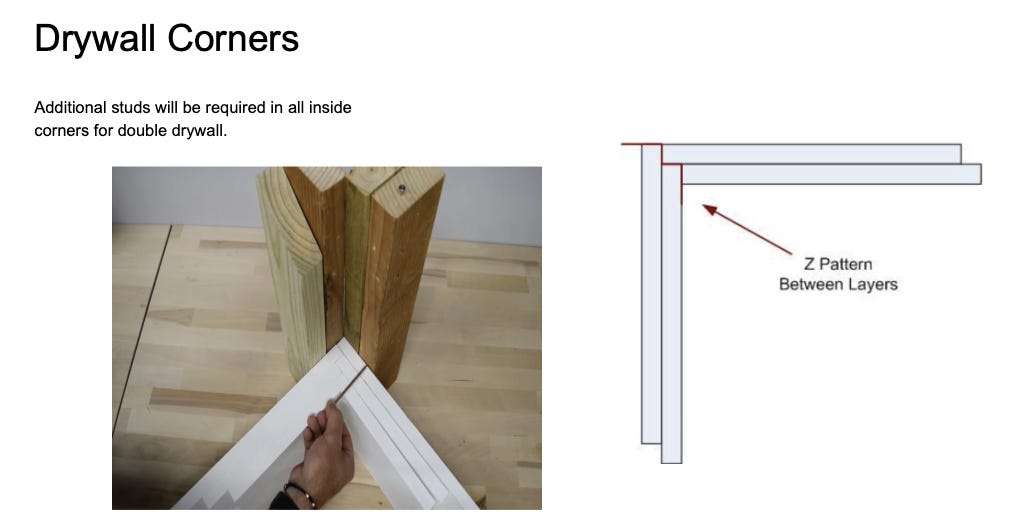
For example, how to handle corners. This photos shows how a corner in an isolated room with multiple layers of drywall is often put together. (This photo and drawing doesn't show the so called "Green Glue," but it should be there. This photo also assumes double studs walls since you see the drywall being attached to wood and not hat channel supported by clips.)
And on the subject of "Green Glue," I should mention that:
Green Glue works** and in many places.***
Green Glue is NOT the only acceptable product. There are others, like Sound Damp.

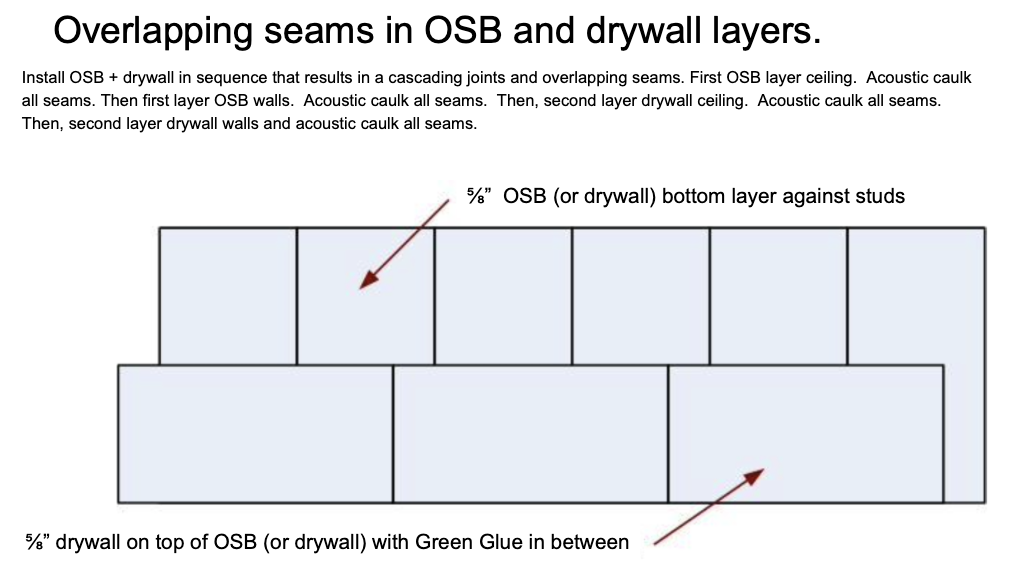
TLDR, no one has found something cheaper than green glue......Anyways, back to construction examples. This is a popular pattern for the layout of multiple layers of drywall.
And there are key practices when hanging the drywall.

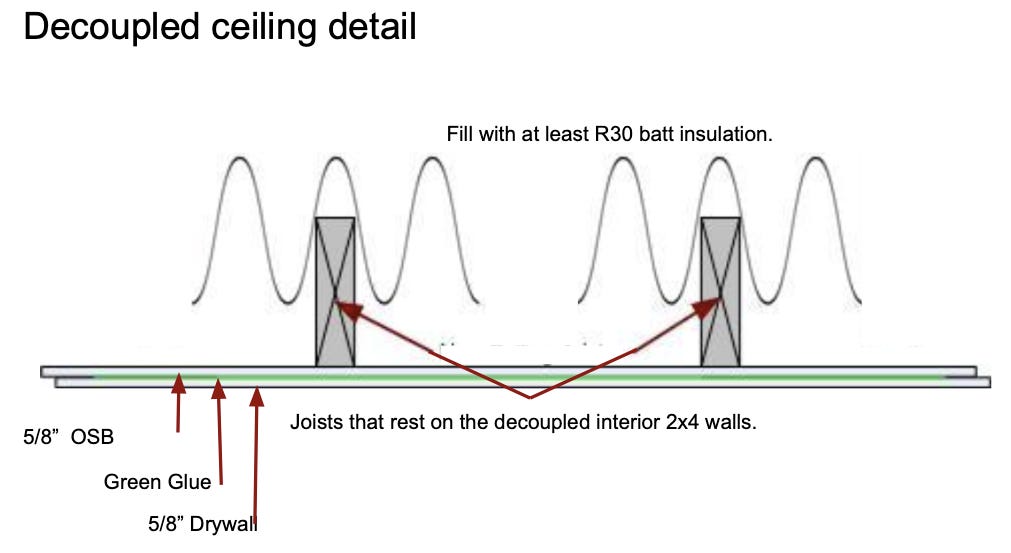
And remember that decoupled ceiling? It gets a similar approach when drywalling.
This first picture assumes these are NOT the floor joists of the room above (or attic) but, rather, are rafters sitting on decoupled dual walls. (If you were using clips and channels here, then the drywall would be shown attached to the channels, the channels attached to clips, and clips attached to the joists that are part of the main structure.)
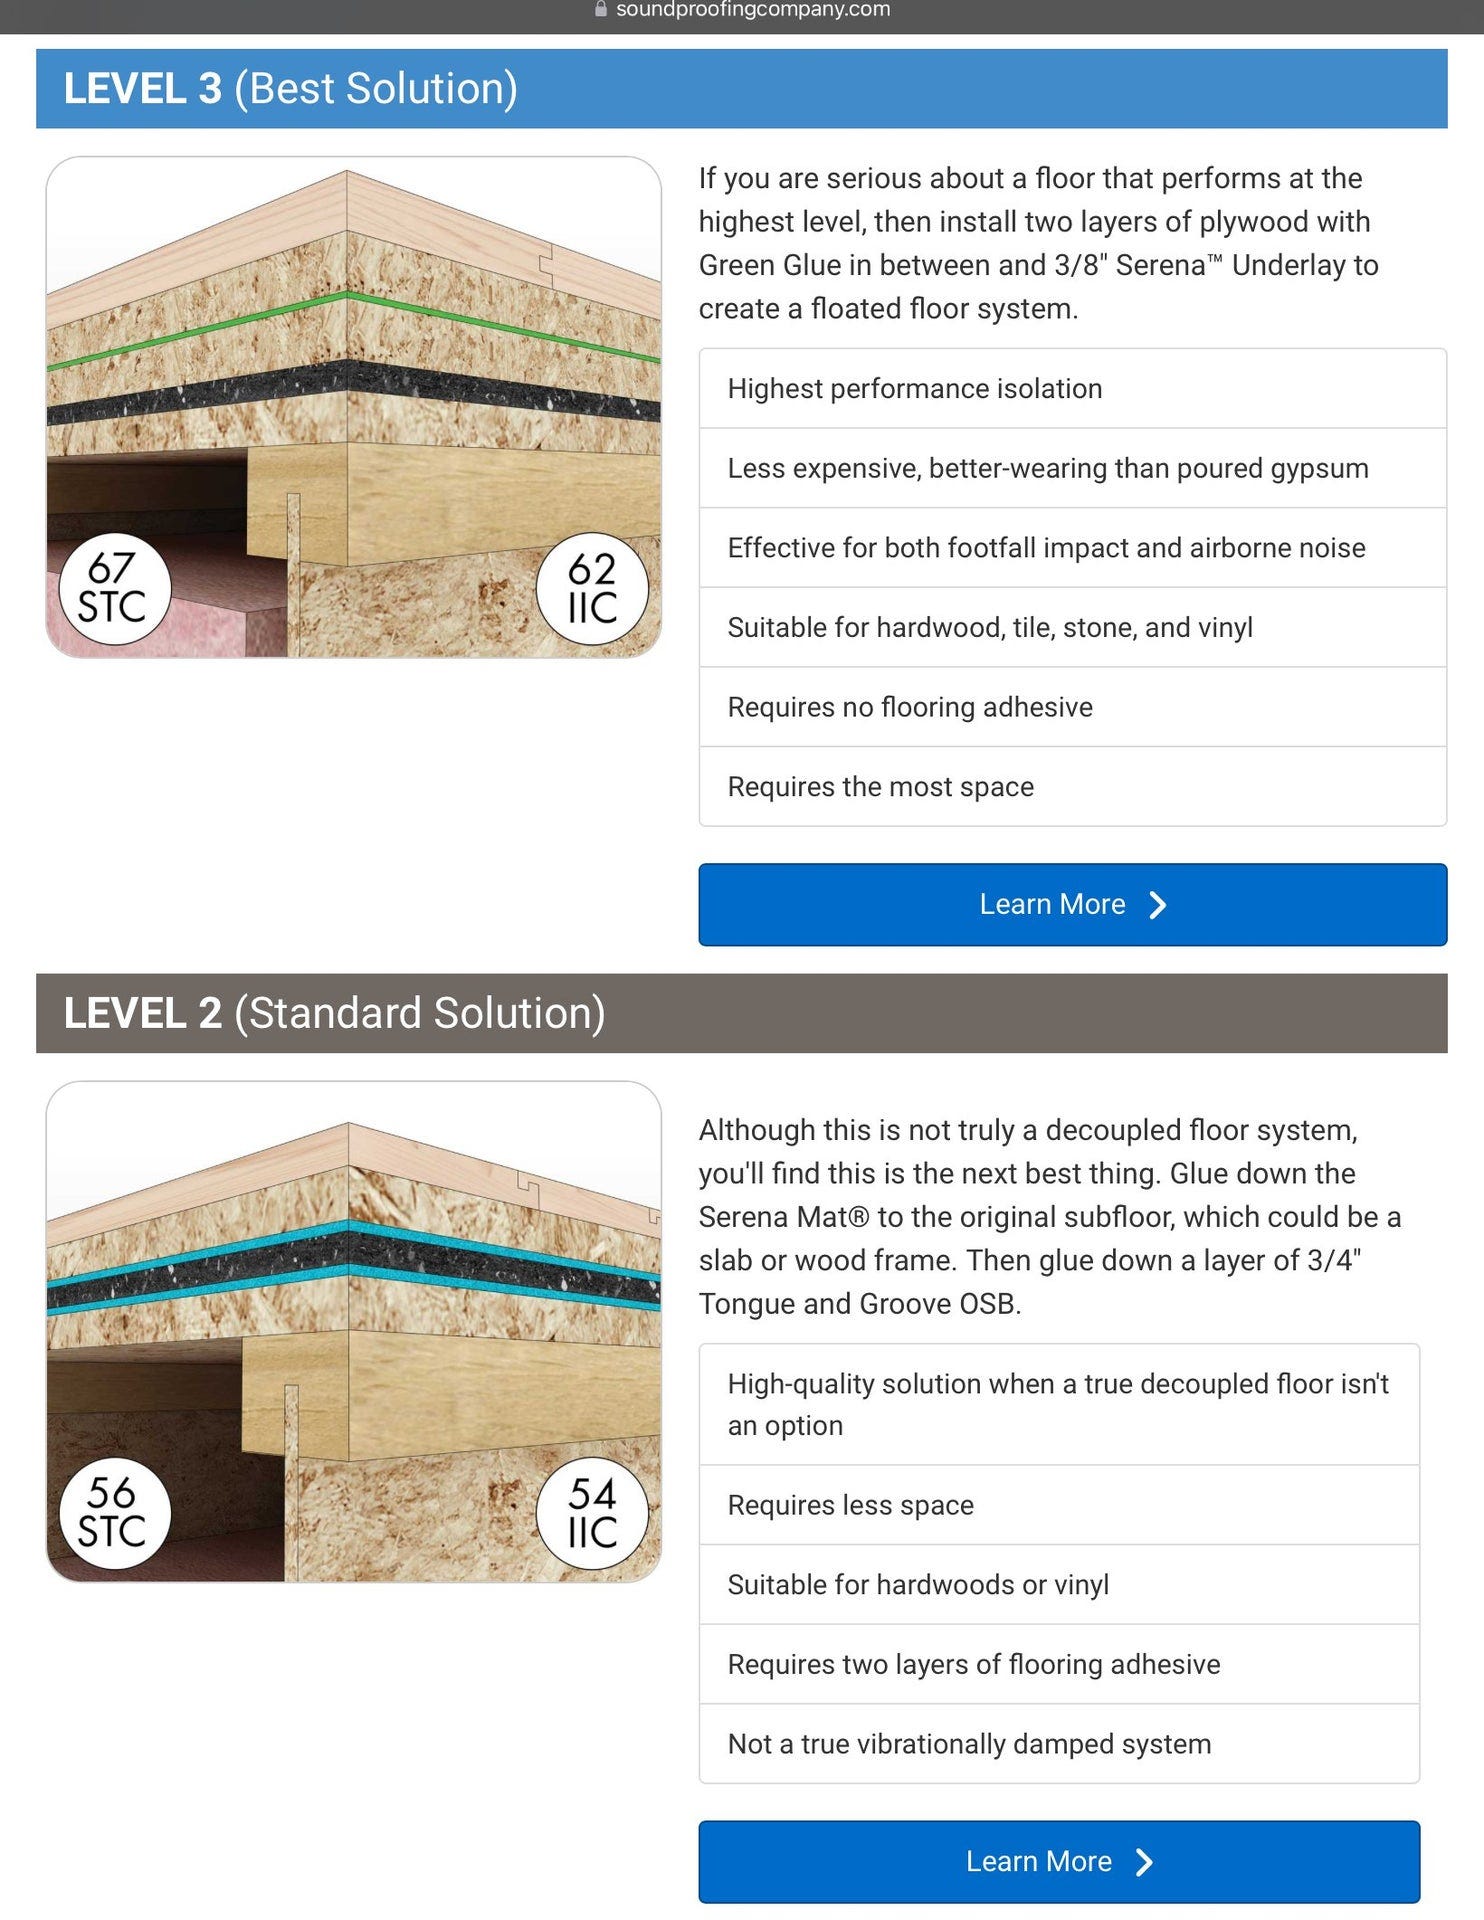
FLOORS
Flooring is critical as well, especially when it is sitting on joists and not on a slab.
Decoupling is again the key. (Many people don't worry about decoupling on a slab, and that may be fine in terms of isolation, but a floating floor on a slab has thermal benefits as tends to have nicer tactile response, in addition to whatever isolation benefits it confers.)
An example from another build on AVS, from gregcams theater, of floor isolation.
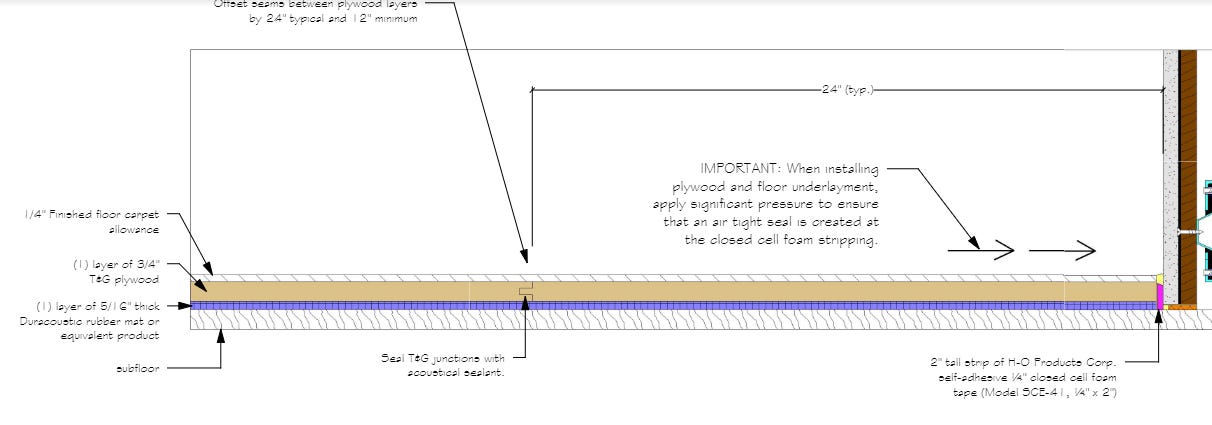
That is similar to what Soundproofing Company talks about on their excellent web site:
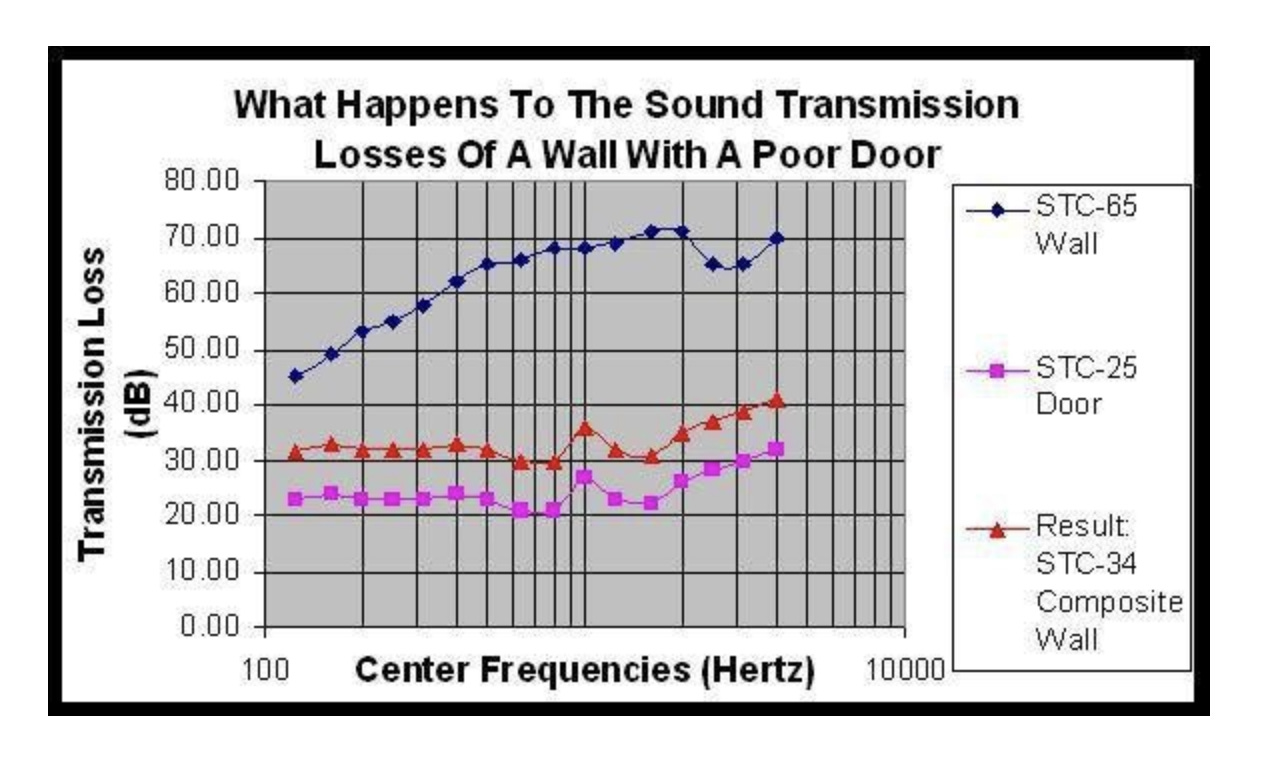
THE WEAKEST LINK
Keep in mind that one wall or section of the room that isn't done as well as the rest of the room can significantly impact the rest of the room. Think: Is a bucket that is 90% solid capable of holding water as well as one that doesn't have a 10% hole?
The key places things can fall apart even if you are careful: Doors, HVAC, Outlets, and other penetrations. For example the door is often the weakest link, as Norman Varney shows in this diagram:
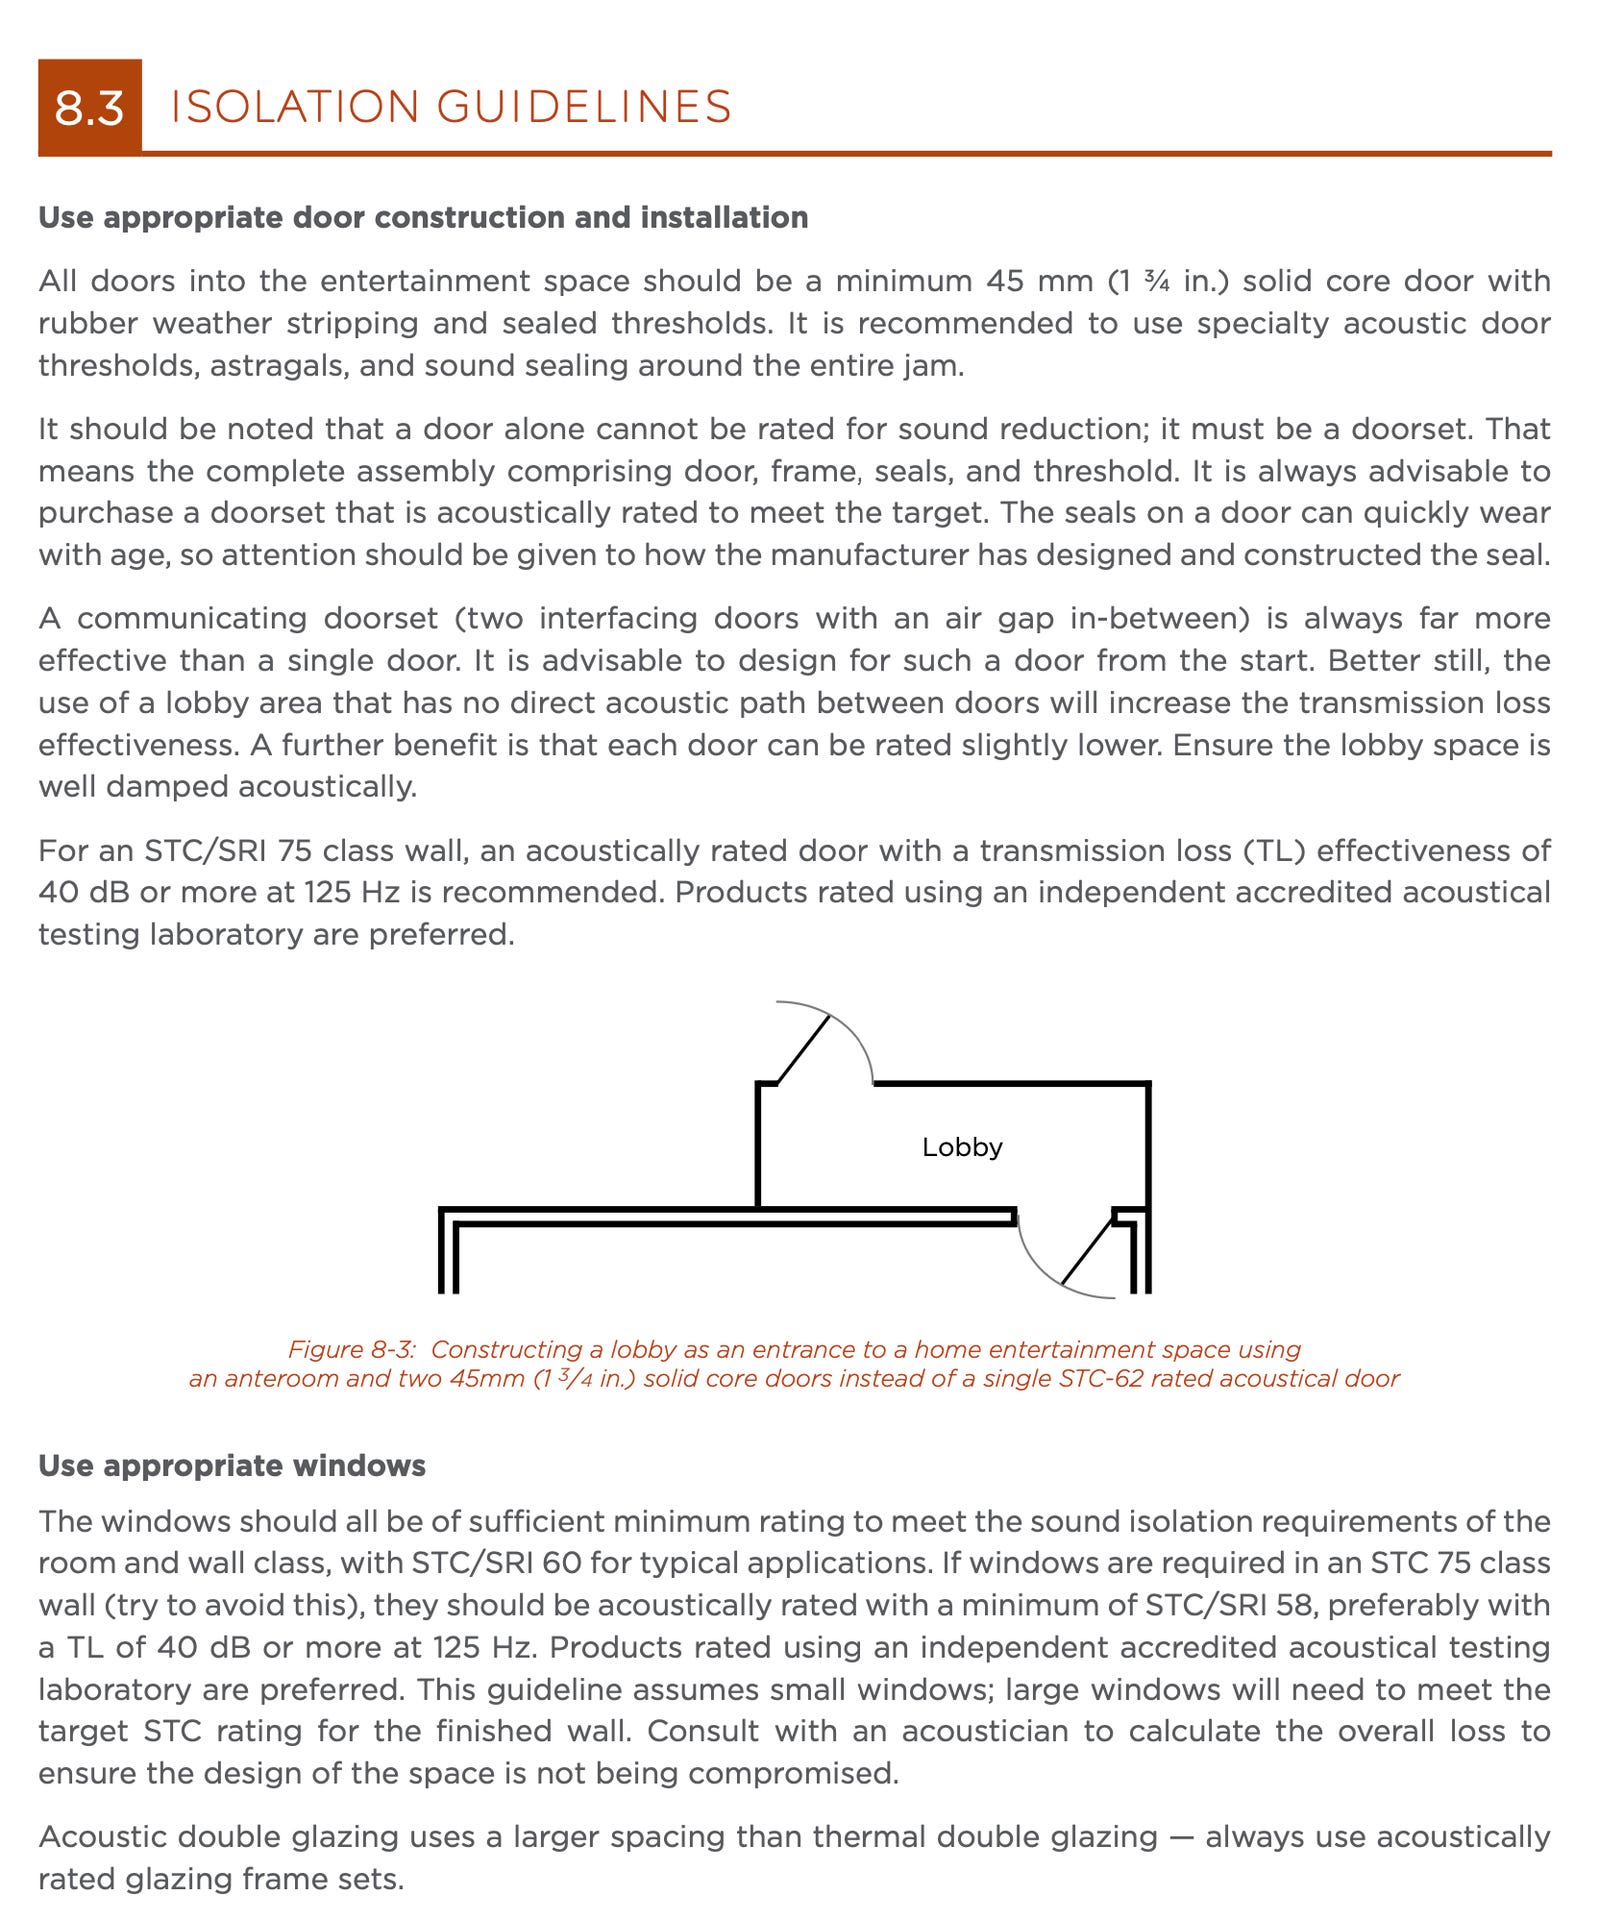
DOORS
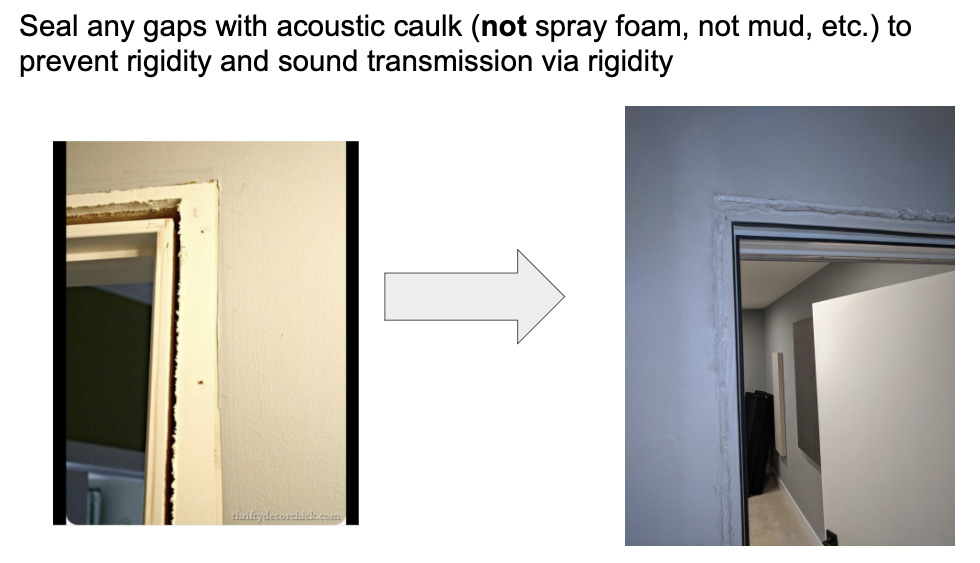
Door Construction when the goal is acoustic isolation is a little unusual:
Don’t leave the usual gaps between frame and wall found in traditional building
Make the gaps between frame and wall very small and fill them with generous amount of acoustic caulk (not rigid foam, not mud, nor similarly rigid material)
Unless you want to pay up for a specialized door (which can weigh hundreds of pounds and cost thousands of dollars, the best prices are at places like IsoStore but still start at $2,200 USD and weigh 150 lbs) at a minimum, a door should be a 1 3/4 inch thick solid core. “solid core 1 ¾" (commercial thickness) flush/slab interior doors”
Sealing: Around the edges of the door use rubber seals. On the bottom of the door, use a mechanical seal that will press down on the floor when the door is closed, like excellent weather sealing.
Gaskets are available from several companies. Soundproofing Company shows how theirs should be used, here, and other companies like Zero International have other styles and options and price points. Pemko seems to be the best value and they have quite a few options to choose from.
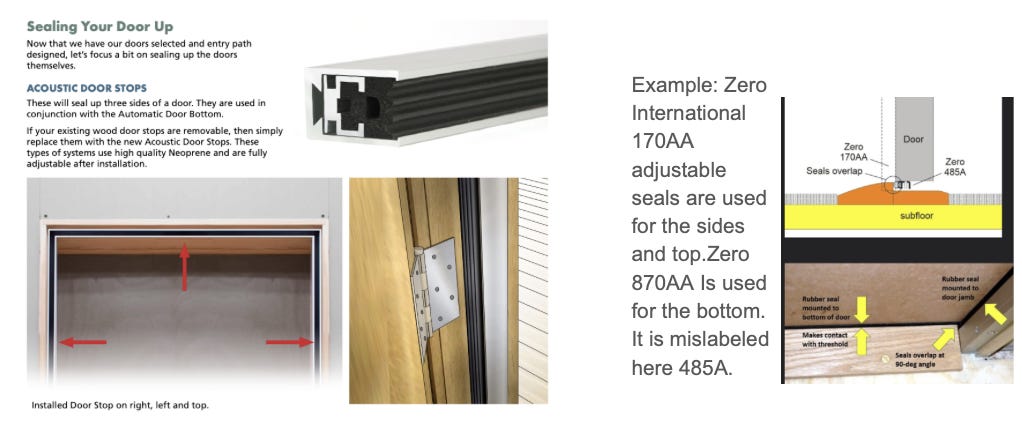
Heck, a very serious door won't have a handle that goes through the door since that penetration can allow more sound to escape than a solid door otherwise would. In such situations, a magnet might be used to old the door closed, and the handle might just be secured to the unbroken surface on each side....
And if you have built a whole double wall system, then a dual door system is a wise move, versus a single door. It will really reduce sound transmission. In fact, two mediocre solid core doors will do more than one expensive heavy door. And some people are able to do this with a thick wall, rather than in a dual wall system.
Here is an example from a fellow AVS member.

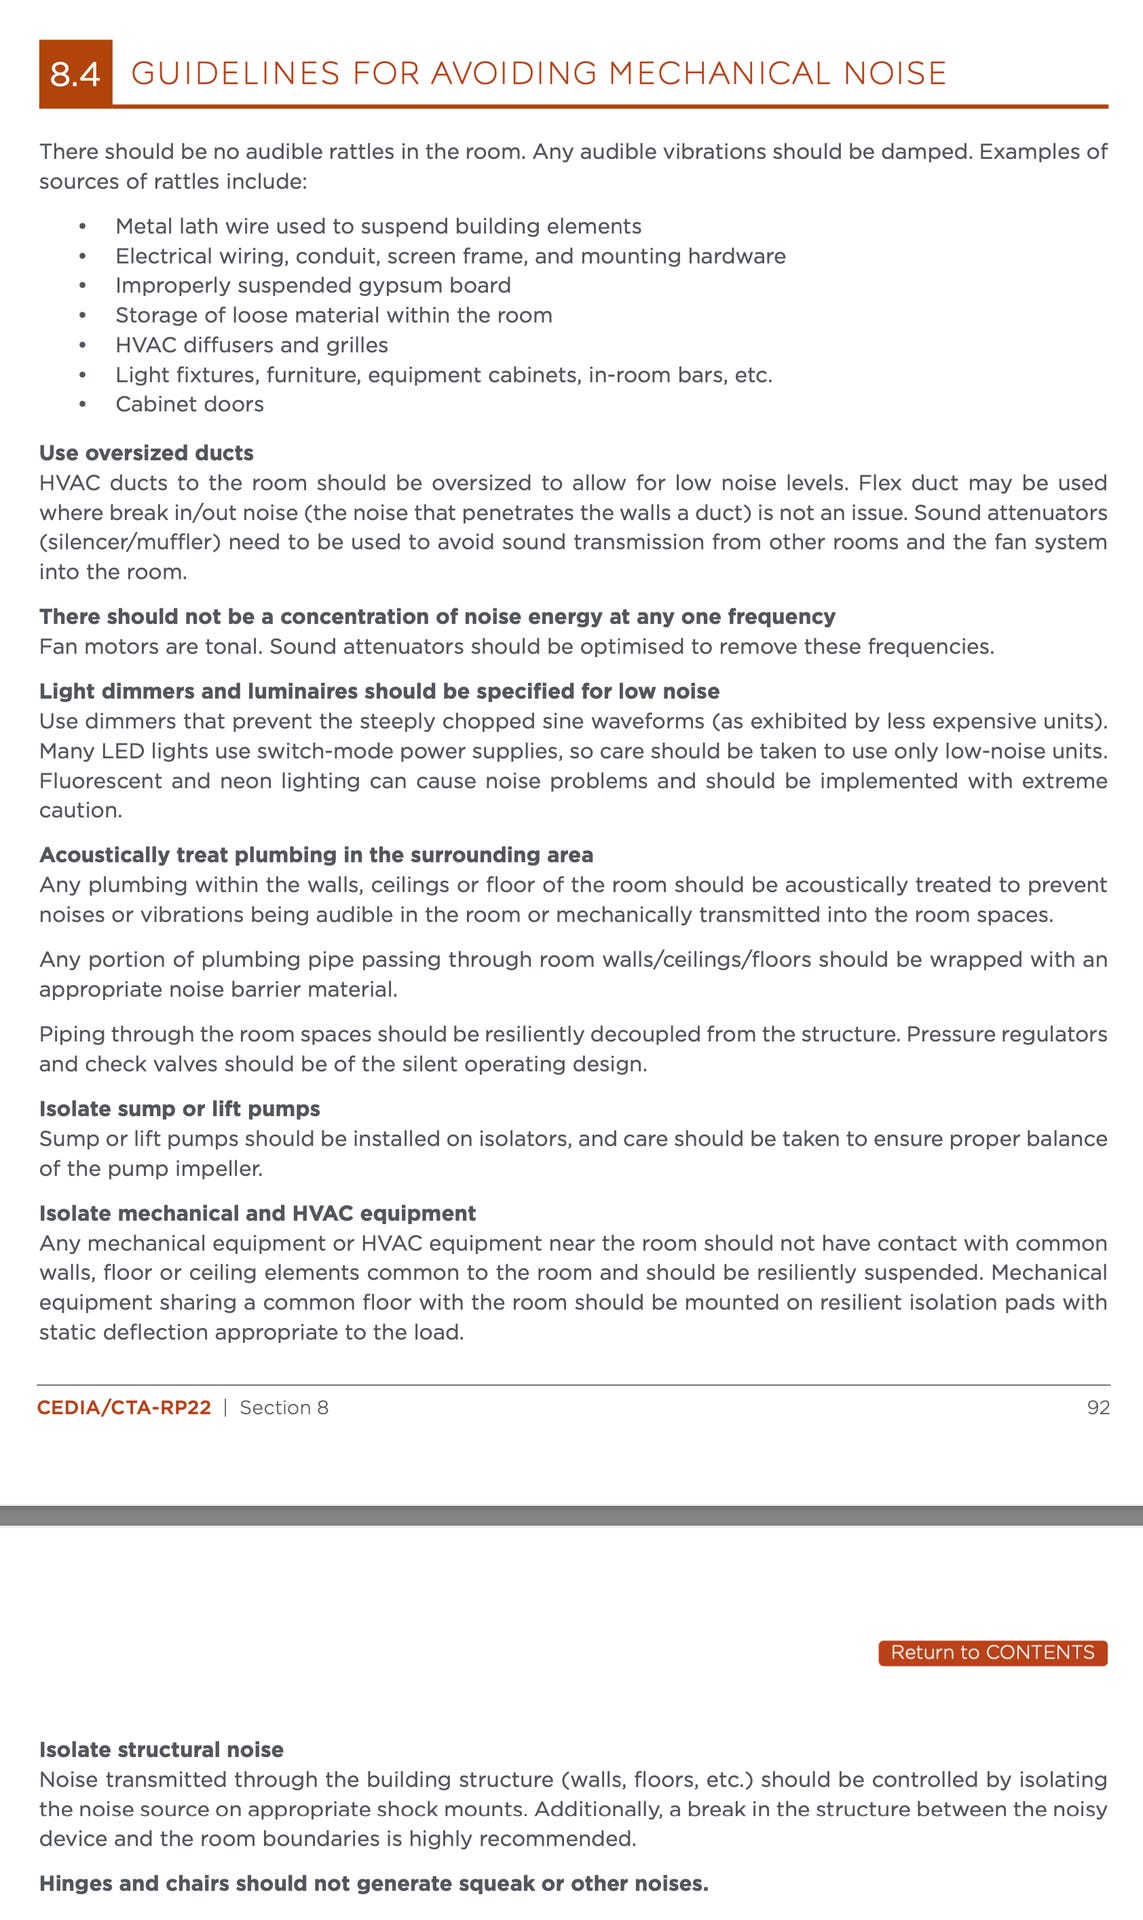
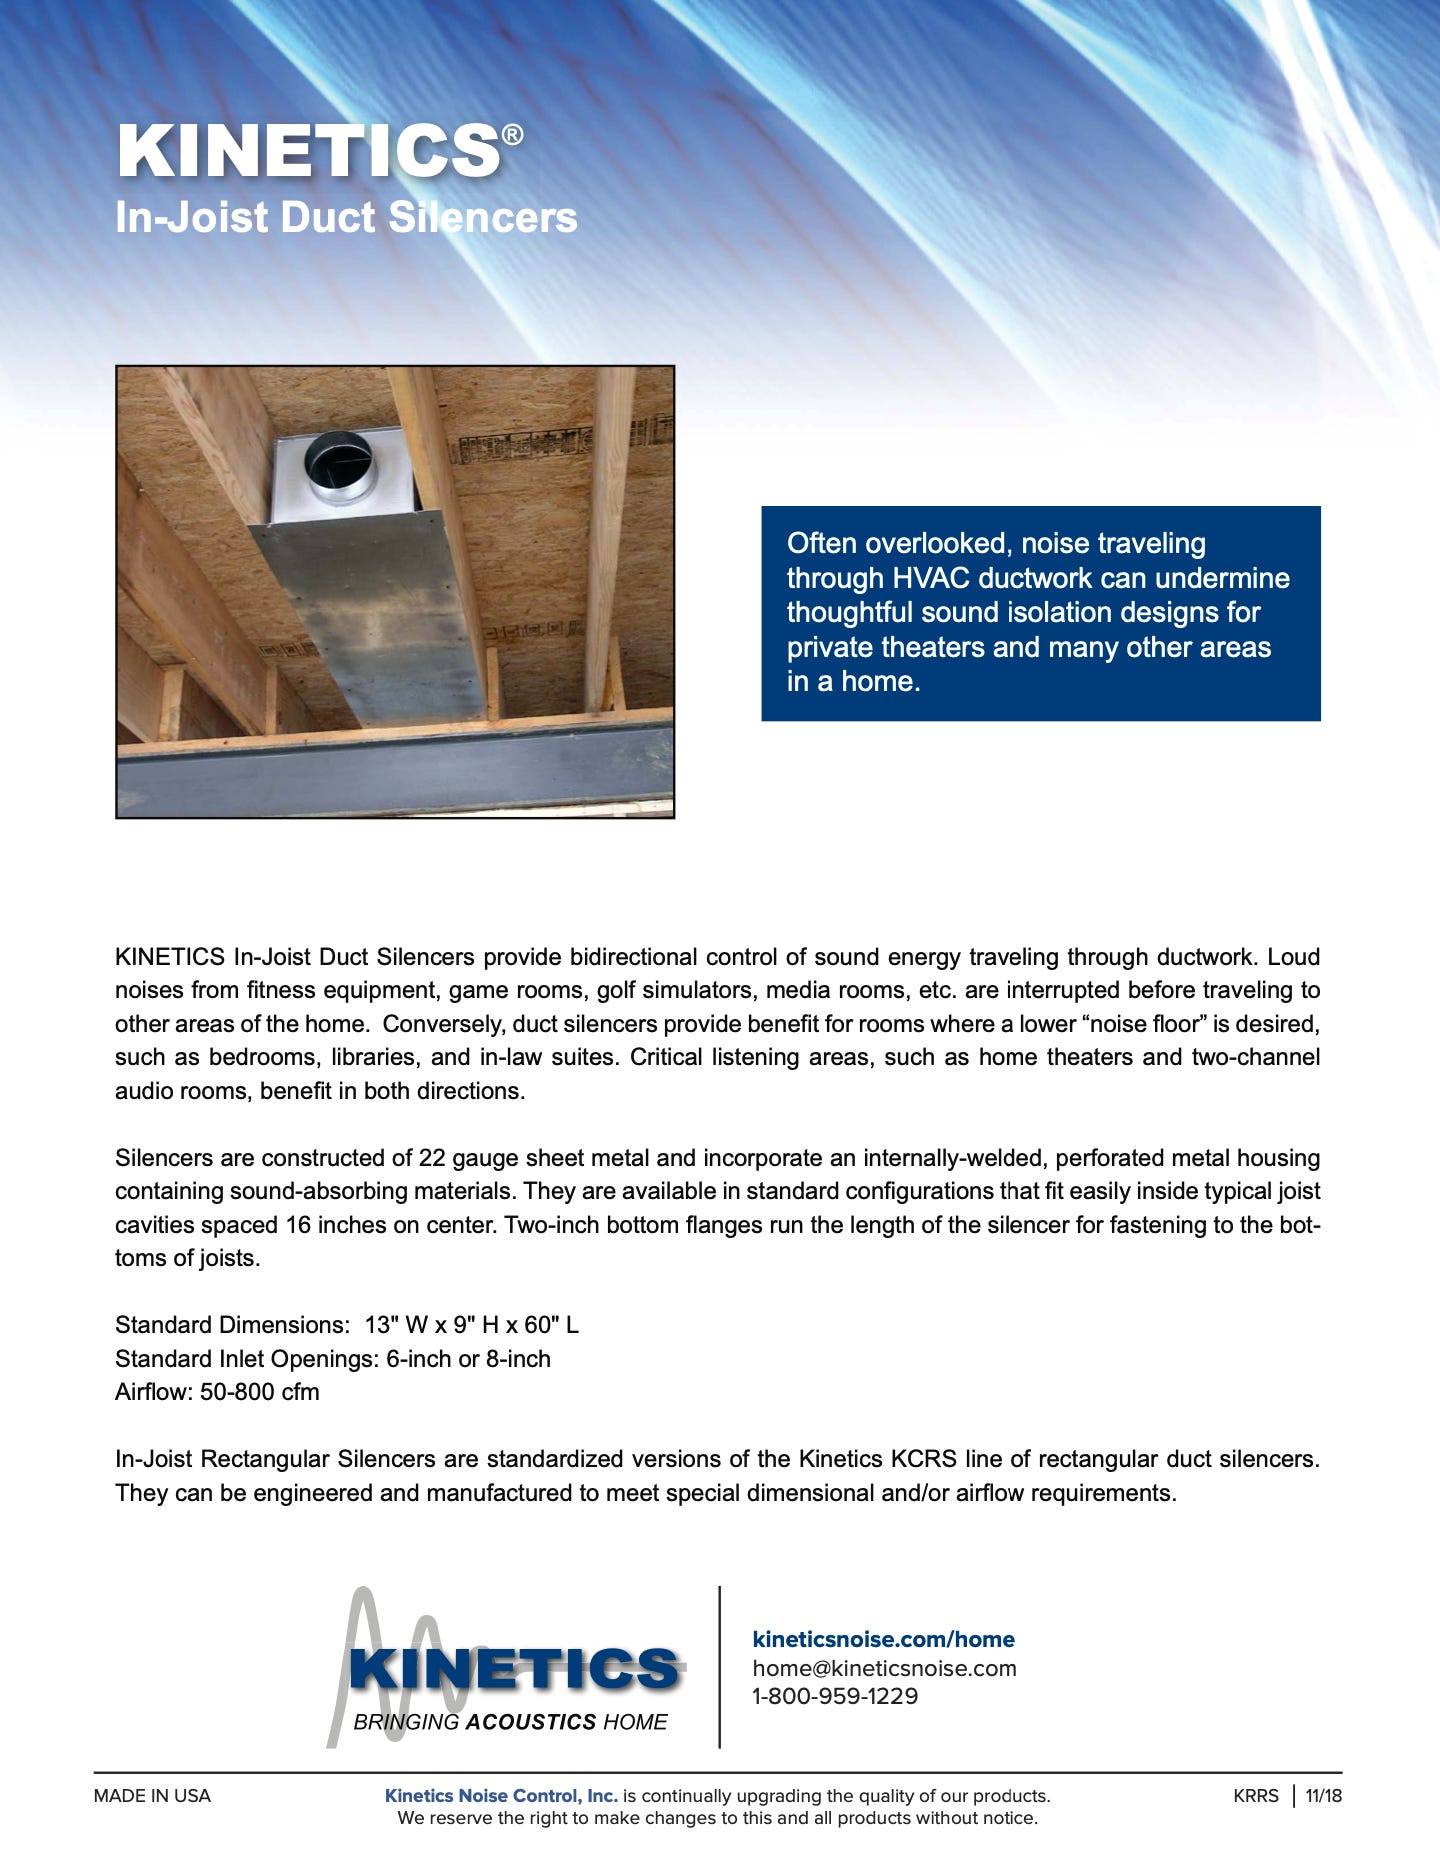
HVAC
Heating, ventilation, and air conditioning (HVAC) can bring in sound from other rooms, and can let sound out into the rest of the house. (The flow of air and or the compressor sounds and other mechanical HVAC stuff can also disturb an otherwise silent room.). But you need fresh air, conditioned air, going into a sealed room and you need a way for that air to exit. This is called "supply" and "return" vents, or registers. And both of these "holes" into your room need special consideration for sound isolation. And note that while a regular room might be okay with a simple supply vent, and rely on gaps under the door to allow stale air to exit, in a "sound proof" (ie, air tight) room, you need to have a formal air return, to get that stale air out.
Soundproofing company again is a good resource....
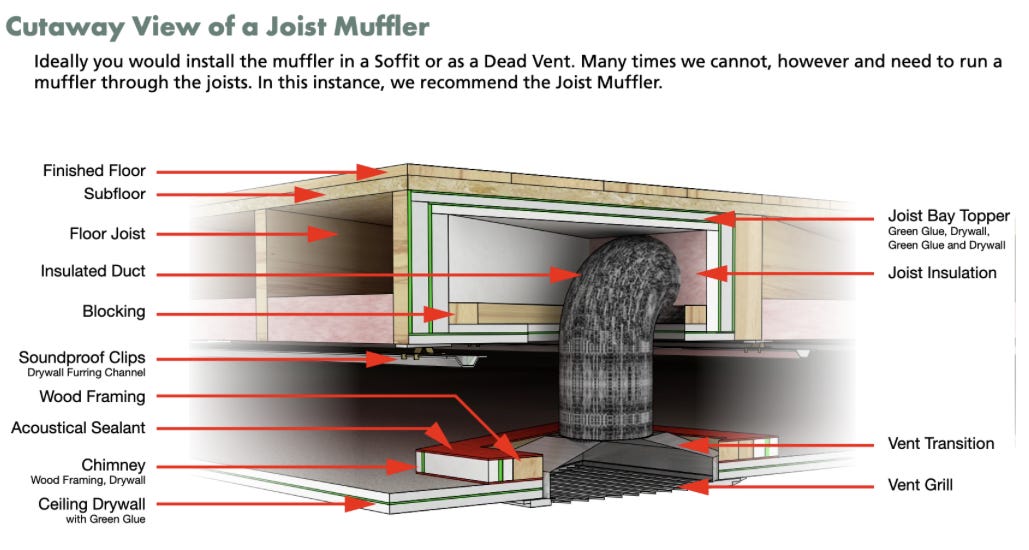
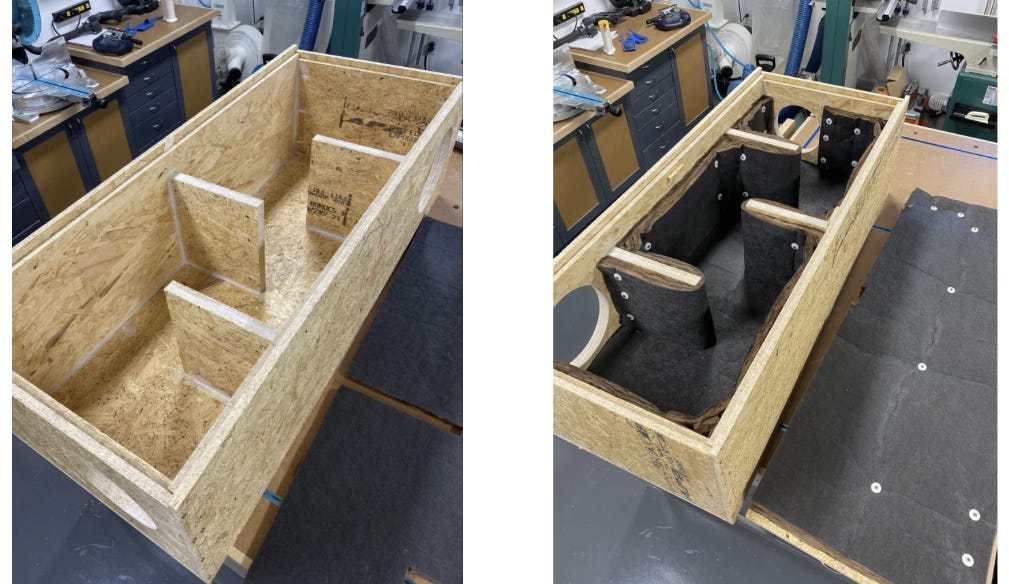
... but creativity and collaboration with a good HVAC specialist it likely required for each specific case.* A fellow AVS member built mufflers like these for their diffusers and air return.
There are commercial solutions too:

Here are my notes after consulting several experts and reading through others' experiences.
Keep air speeds BELOW 300 fpm. Below 200 fpm is much better.
Noise Rating (or Noise Criteria) should not be more than 22 measured .5 meter from any diffuser in a reference theater but 25 or 30 can work.
Target 72 degrees with 55% humidity, when full of people and running all the gear and in the heat of summer. Yes, the load is more like a kitchen than a bedroom.
Air exchange: 8 air exchanges through the handler per hour seems to be the normal goal.
Fresh air: target 12-15 cubic feet of fresh air per hour per person, meaning a closed loop system will need at ERV or similar technology to bring in fresh air.
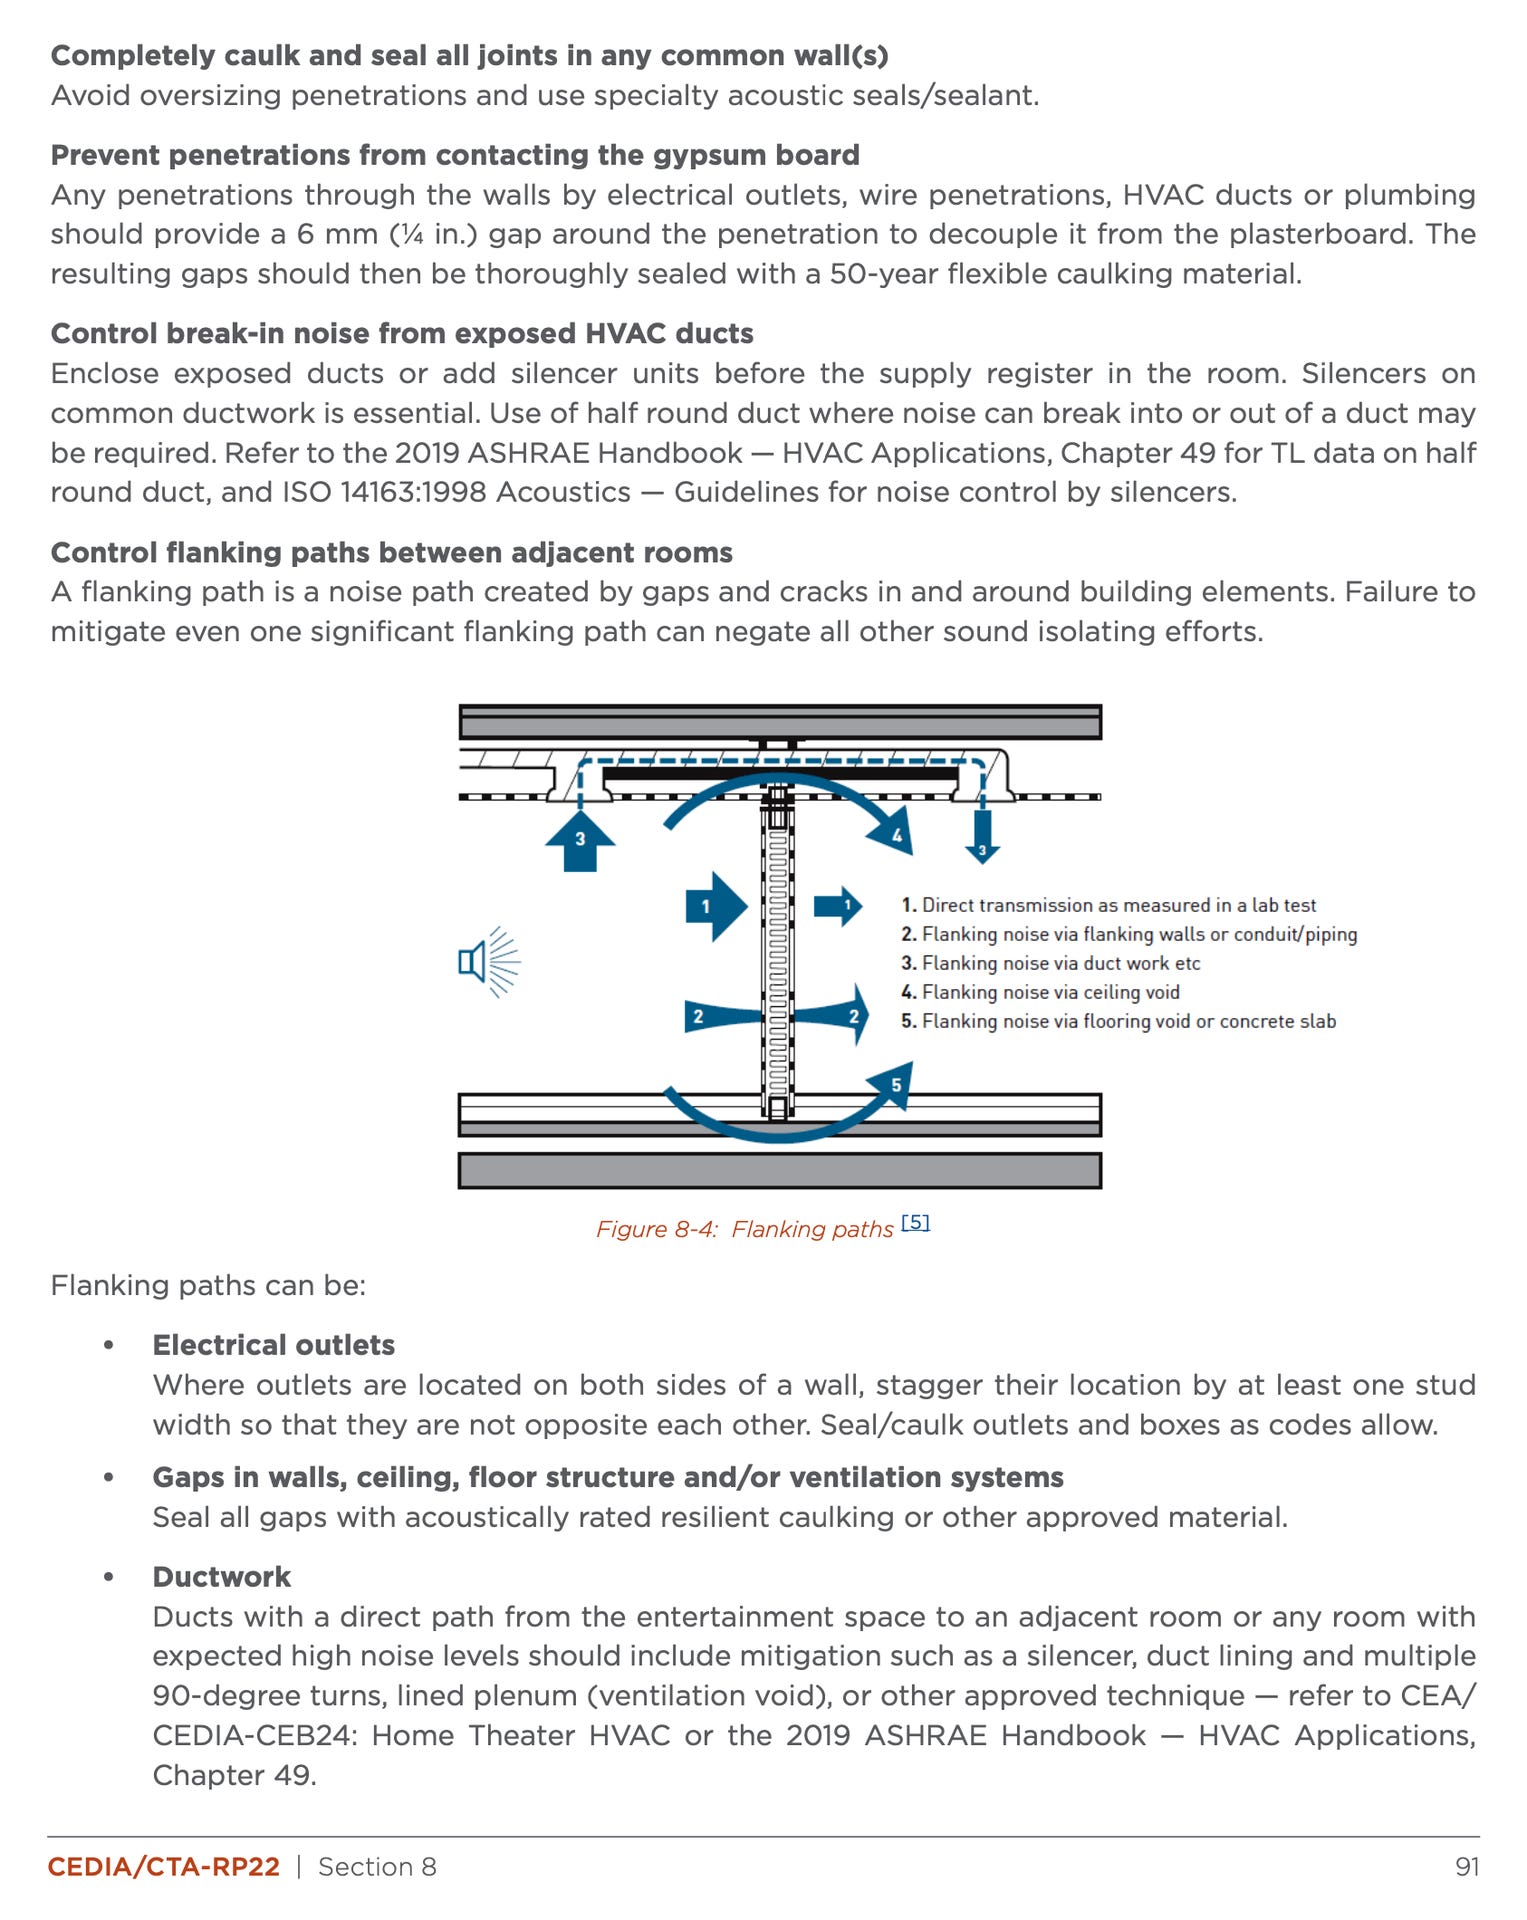
OTHER FLANKING PATHS
Flanking paths are ways for sound to get in and out, circumventing (flanking) your sound isolation efforts. Outlet boxes, in wall speakers, and so on all break the barriers you have created and must be handled well.Jeff (bigmouthindc on AVS Forum) has shared these images illustrating that:

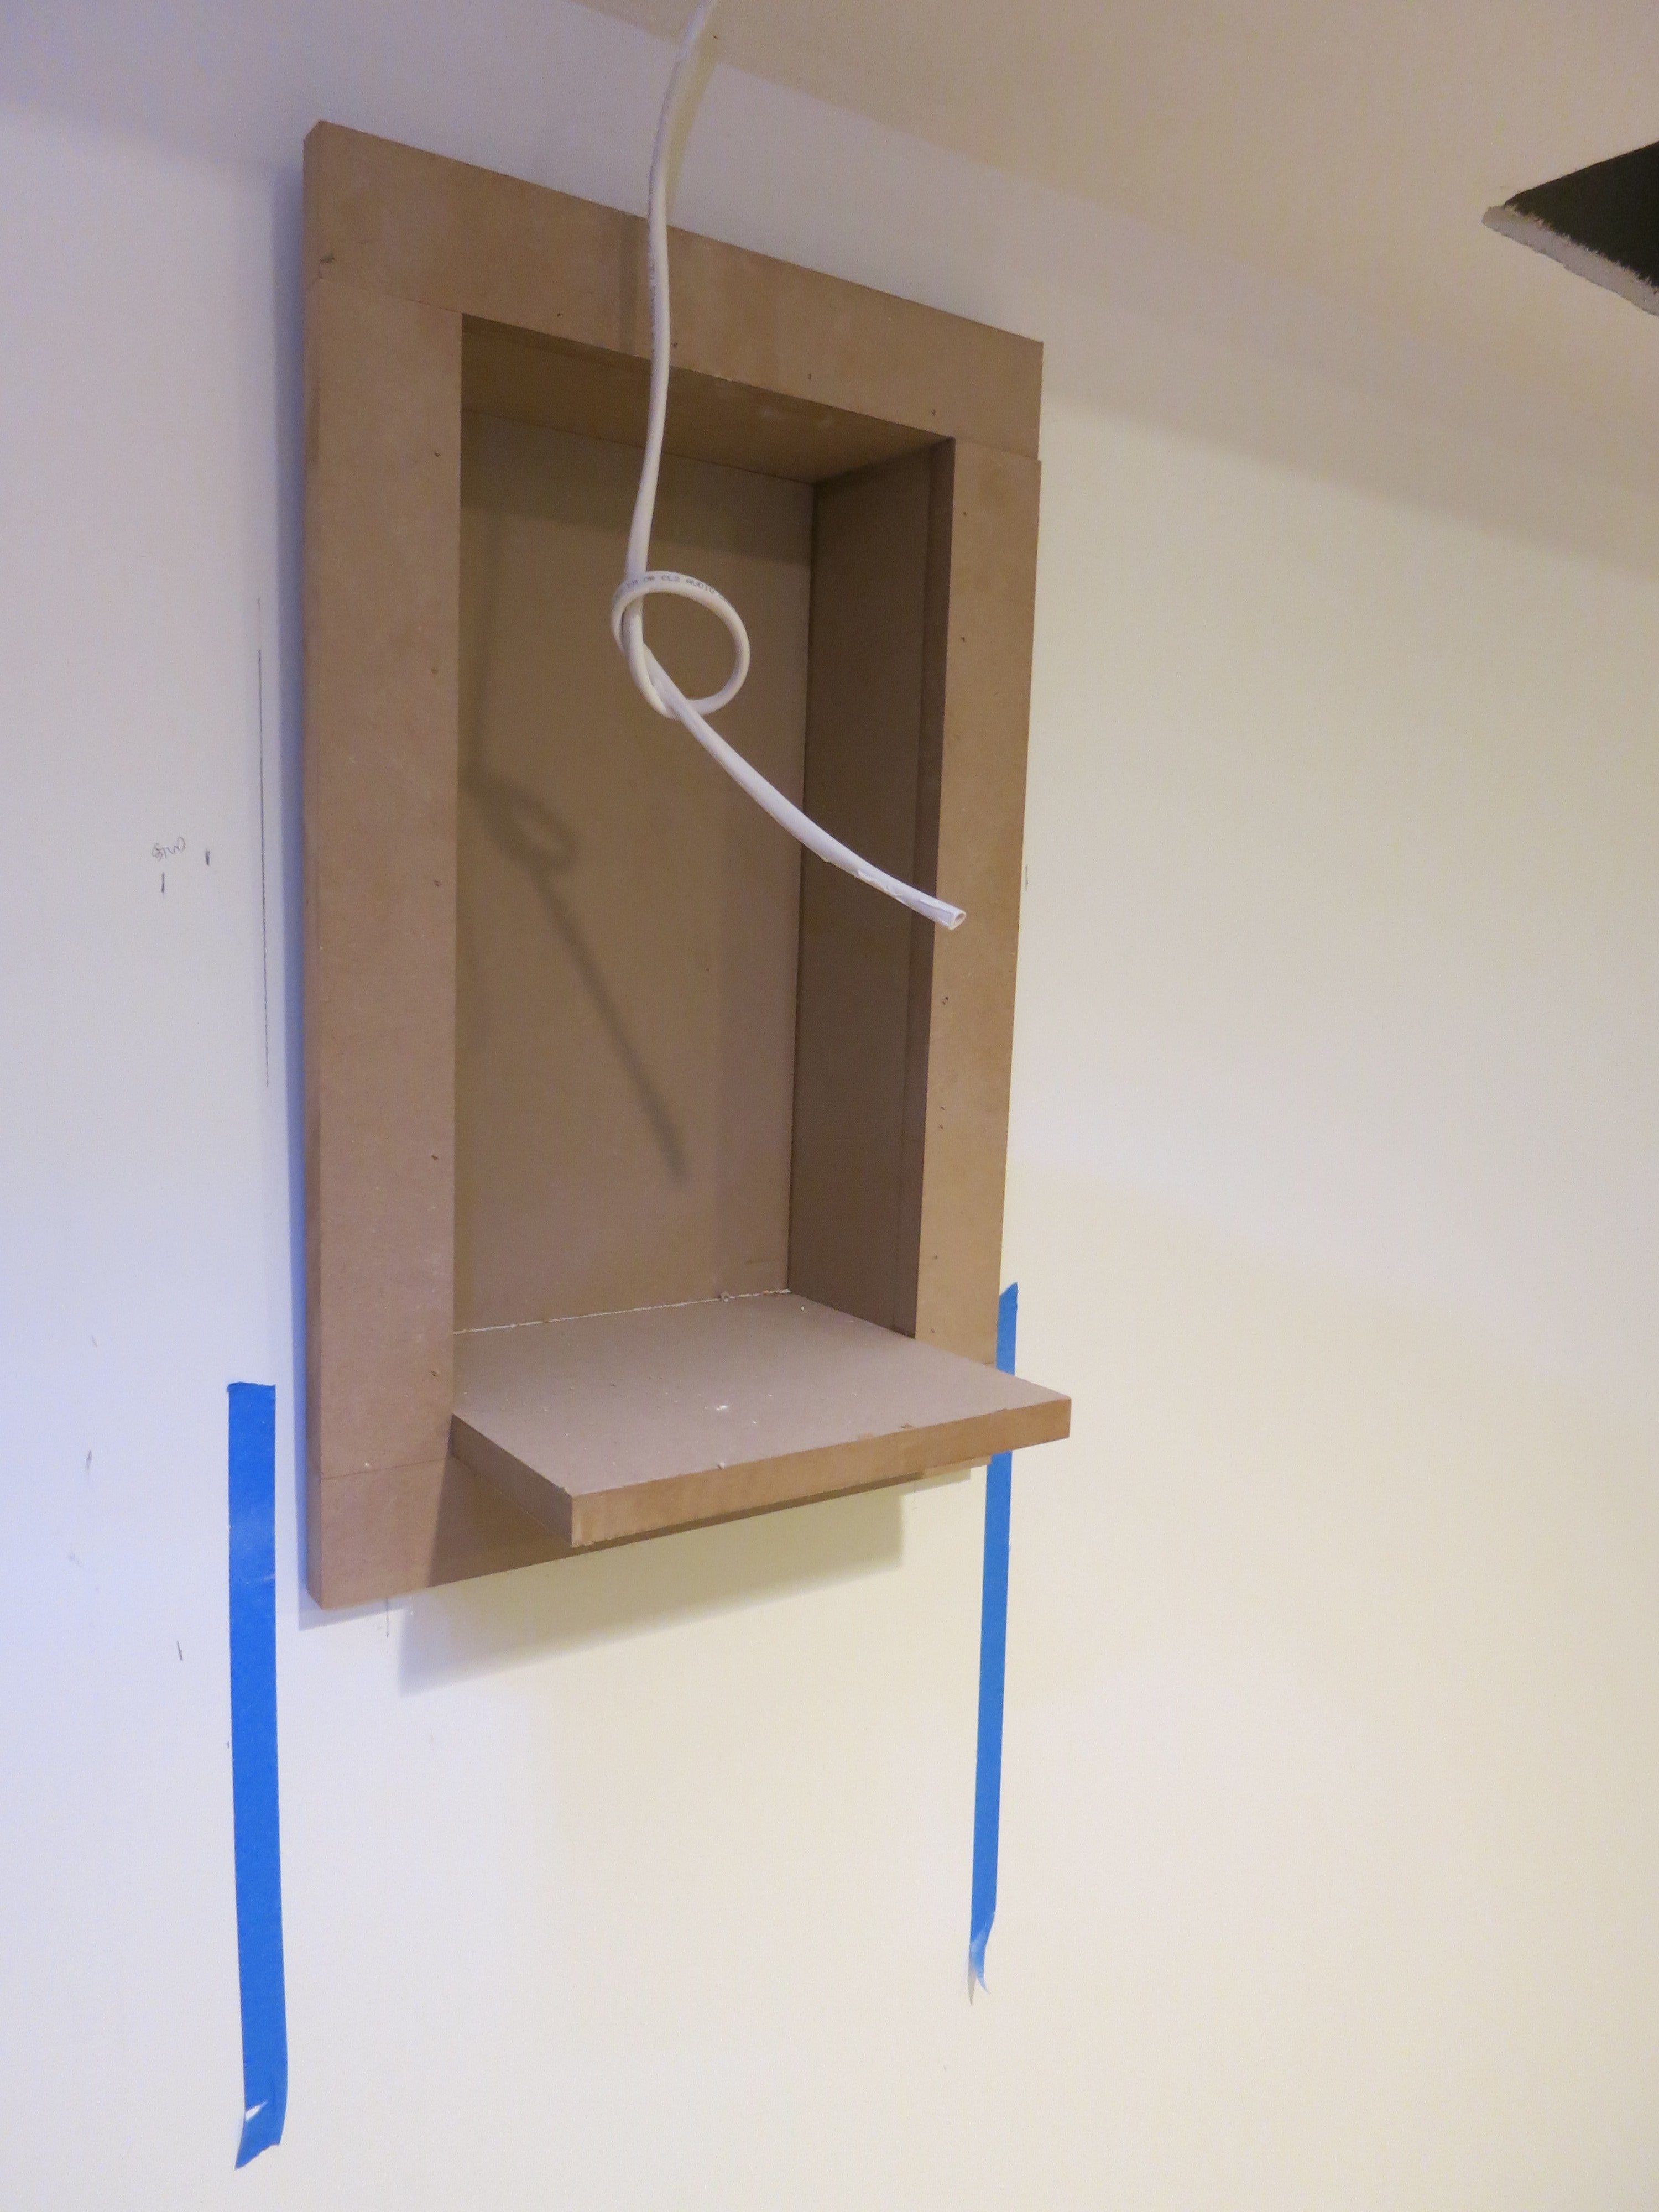
Ideally you would have no outlets breaking the shell of the room, and surface mount all the electrical elements (making sure you are code compliant) but that is not always an option. If you need traditional in wall outlets, consider something like this:
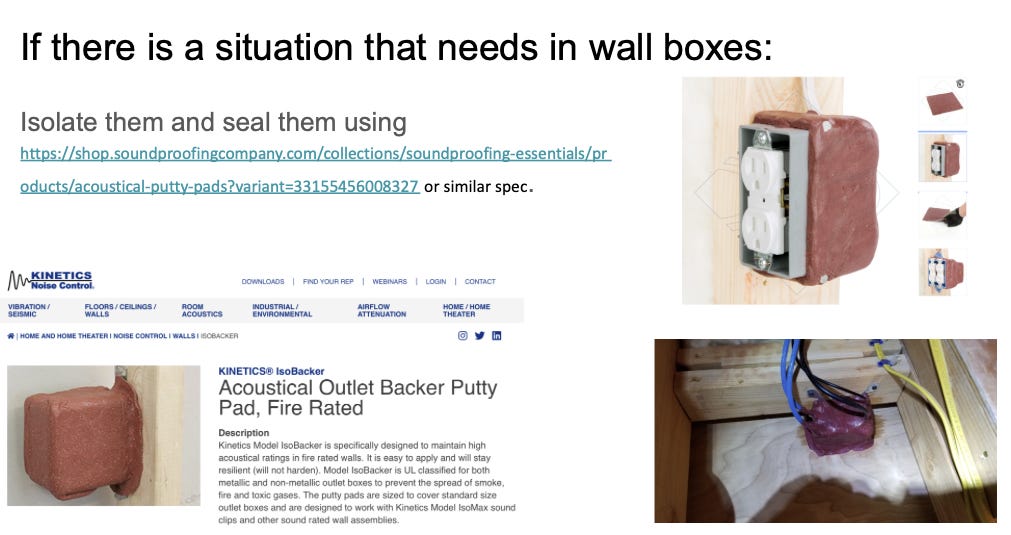
People build dedicated “back boxes” for inwall/ceiling speakers, or for lights, and all other penetrations in order to keep the room acoustically sealed.
SILENCE IN THE STUDIO ROOM
Keep in mind, as well, that the only sound you want to hear in the theater is from the content in the movie. Background noise created IN the theater needs to be well controlled too. HVAC, projector exhaust, the fridge, and so on all need to be silenced otherwise you are polluting your experience.
In other words: Gear inside the theater can degrade the sound of a theater.
Gear racks in the theater space create heat. Lots of heat. Projectors create even more heat, often like a space heater. To dissipate heat you need aggressive HVAC, which can be noisy.
Even pointing the AC at the rack won't reduce the heat the rack produces. You will still need two or three times as much AC in the room versus every other room in the house, ie, something like what a kitchen requires.
Why does that matter? Well you will probably to set your thermostat to 60 degrees in the summer, to keep the theater at 70 degrees. If you live alone or everyone is in the theater, it might work out fine (but expensive) Since that means turning the rest of the house into a fridge in order to keep the theater cool.
All the airflow tends to be noisy.
Noise, however, is even more problematic, when considering a projector. Think of it this way. A VERY quiet projector is 40db. That's rare. Most are louder. Why does that matter?
It’s not just the heat problem. It also rescues the dynamic range of your audio system.
A movie soundtrack has a dynamic range of 105db. If you have objects in the room making 45db of noise, you have turned your system's dynamic range down by quite a bit. That's a drag. That's about the quality of an old fashion mp3 music file from the year 2000.
But it's even worse than that. The quiet passages on a soundtrack are down in the -83db range (where 0db = reference level) or, in other words, are 22db in level. That's not a typo. 22db. How quiet is that? That's more quiet than any projector on the market. That's more quiet than a fridge in another room behind a closed door. If you drive out of the city, and out of the suburbs, to the middle of nowhere, and there is no wind, that is what 20 db sounds like. The quietest sounds on a soundtrack are almost that low in volume.
So in order to hear the full soundtrack, you need a very quiet room.
If you don't have a quiet room, you will have to turn the volume up past reference level, so you can hear what is going on In the quiet parts. Like when people are talking…..especially when they are talking quietly.
Okay, you say, no problem. I'll turn things up 10 db so I can hear them over the air-conditioning. Or 15 db so I can hear them over the projector.
You know that feeling when you need to turn up the volume to hear the dialog, but then the action starts and it is too loud? Way too loud?
Well, you had to turn up the volume to overcome the room -- part of which is background noise like the projector, fridge, AV vents -- to hear the dialog.
But then that makes the action and music too loud. Way too loud.
A key part of solving that is keeping the noise floor low in the room.
A noise floor of 22 db is hard. And expensive. It involves special construction, close attention and modification to the HVAC system. And definitely keeping the projector and gear outside of the room. It is a six figure construction job.
That's not necessarily something most of us can afford! So we do the best we can. And that means things like replacing doors with solid core doors with gaskets around them. Moving the gear, especially a projector, outside the room. Increasing the side of the HVAC vents (both supply and return) so that air flow noise is lower. Why? Because if we cannot rebuild the room, at least we can modify it and our design based on what is most intrusive.
What's the biggest source of noise in a theater? Usually the projector. Then, the HVAC. Then general ambient noise from the house. Then things like a gear rack with cooling. How to solve it? Keep that heat and noise out of the room.
Footnotes
*Additional important HVAC notes.
I would start with a manual j calculation to see how much heating or cooling you will need. Your projector should be included in the calculation if it's not isolated in a hush box or separate room.
Multiply your projector wattage by 3.41 to get the BTU/hr of heat produced
Each occupant creates ~400-500 BTU/hr at rest
You can do it yourself here for free: Cool Calc Manual J Software | Create a Free Account | Only $3/Report
Be aware that the AC Infinity in line duct fans work great (I have 2 of them) but they are far from quiet and steps should be taken if noise floor is a priority for the theater.
I would plan on only using insulated flex duct and try for 3- 90 degree bends for each take off from the main furnace supply trunk to mitigate noise. Try for oversized 8-10" insulated flex duct if possible. You could even remove the insulation to lessen the diameter of the duct when space gets tight towards the theater space.
For your duct mufflers that transition your flex duct to your supply and return grates, size matters. The longer the box used, the lower in frequency it will perform in attenuation of sound into and out of the theater. I would shoot for 6 feet minimum. They can be long and skinny to fit inside the joist cavity. I ended up with a single supply instead of 2 supplies for our theater space to avoid having to stuff too much duct work into a single joist cavity and it works fine.
Custom HVAC grates can be ordered from here for low noise applications (I use 4"x36" bar linear diffusers from dayus model DABL-82-A):HVACQuick - residential
residential products
www.hvacquick.com
And you can play with calculators here to see what CFM and duct size would work to eliminate noise though the duct and also at the supply/return grates (keeping LFM to 250 or less for the duct diameter and supply grate) don't forget to subtract out the space for the % open area of your chosen HVAC grates (mine are 75% open area):https://www.engineering.com/calculators/air-flow-conversion-calculator/
Realize that this change in your HVAC system doesn't happen in isolation and you will be affecting the static pressure for the rest of your homes HVAC system which could affect air flow/dehumidification for the rest of your house in a less than desirable fashion (even if your main HVAC system has plenty of spare BTU's to spare).
If it were me I would at least run this stuff by a professional HVAC contractor to make sure you're not going to screw up the rest of your homes HVAC prior to pulling the trigger.
**About Green Glue, at https://www.digistar.cl/Forum/viewtopic.php?t=773 there is quite a bit of useful info, including:
Basically, it's a good product, and it works well, but it is expensive. Very expensive. So it is not for everyone. On a tight budget, don't use it (unless you need very high isolation, and can find more money!)
On the other hand, using full coverage recommended by Green Glue (three tubes per 4'x8' / 120x240cm sheet of drywall) is about the same as adding THREE TIMES AS MANY layers of drywall to your wall (on each side).
How can I make such a ridiculous statement? Where do I get that from? Right here (image below). That comes from the tests comparing Green Glue compound to MLV, and shows the clear superiority of Green Glue, but also note the comment in the test description: the improvement from using Green Glue is similar to the improvement you would get from "tripling the mass", which implies adding three times the number of layers of drywall to the existing wall, on each side. That alone is mighty impressive. (Also note that this testing was done down to 31 Hz, which is also impressive!)
 Viewed 29334 times")
*** Green Glue works surprisingly well in many places, some of which you might not think to use it, as described at https://www.tmsoundproofing.com/Green-Glue-Data-and-Comparison.html such as:
Effects of Green Glue in a Wood Stud Wall

Results:
Green Glue transforms the sound isolation of common wood stud walls from poor to excellent. For wall of the same weight in this comparison, Green Glue adds 10 STC points and improves low frequency performance by as much as 12 dB.
Effects of Green Glue in a Staggered Stud Wall

Results:
Green Glue works on normally high performance walls such as staggered stud walls as well. For walls of the same weight in this comparison, Green Glue adds 9 STC points and improves low frequency performnace by as much as 10 dB.
Effects of Green Glue on Poorly Installed Resilient Channel

Results:
Walls built with resilient channel are frequently installed incorrectly with screws penetrating into studs and eliminating the flexibility of the resilient channels, creating short circuits. Adding Green Glue and drywall to such walls dramatically restores the performance of these walls, allowing poor-performance resilient channel walls to be 'repaired' in the field without expensive reconstruction.
Effects of Green Glue in Floors - Field Test

Results:
Hard surfaces like hardwood and tile often result in excessive noise from footsteps and other impacts on the floor. This field test shows how effective Green Glue can be at reducing those. Even with the harder tile surface, results are substantially better.
Effects of Green Glue in Floors - Lab Test

Results:
Green Glue in a floor results in large reduction in footsteps and other impact noise. Used just in the floor, with no changes to joists, insulation or ceiling, Green Glue reduces impact noise by an average of 8.5 dB. IIC improves 7, STC improves 6.
Effects of Green Glue in a Steel Stud Wall

Results:
Green Glue improves the performance of metal stud walls considerably. For walls of the same weight in this comparison, Green Glue adds 9 STC points and improves low frequency performances as well.
Green Glue vs. Factory Damped Drywall with Resilient Channel

Results:
Green Glue easily outperforms these 2 types of factory-damped drywall, especially at low frequencies. The higher weight of a Green Glue assembly (2 layers of conventional drywall + Green Glue) relative to a thin factory-laminated panel and the superb performance of Green Glue itself deliver better results.
Green Glue vs. Competitive Damping Glues

Results:
We know of no competitive products that perform as well as Green Glue, although there are some that claim to. Two comparisons are shown here - same frame, same weight of drywall, same application of damping material - but both fall well short of Green Glue's performance, especially at lower frequencies.
Green Glue vs. Factory Damped Drywall - Wood Studs

Results:
Green Glue outperforms all thin factory-laminated “soundproof” drywall products. Even exotic ones with metal and more than one layer of damping material. The secret to Green Glues superior performance is simple. A Green Glue wall, with 2 layers of normal, low-cost drywall, weighs more. And a Green Glue field application gives a wall with much more viscoelastic material than is contained in factory-laminated panels (which tend to have a very thin layer). Lastly, Green Glue is higher in performance than any other damping material of its type, anywhere in the world, that we are aware of. These advantages are particularly evident at lower frequencies, where Green Glue is up to 8 dB better than the factory-damped product on the same assembly.
Green Glue vs. Conventional Adhesives

Results:
Green Glue's performance is superior to all conventional off-the-self materials. Rigid adhesives lowere performance by stiffening the wall. Common flexible adhesives, like silicone sealant, do not lower performance but contribute very little and tend to be fairly expensive. Green Glue has a dramatic positive effect on wall performance and is both more effective and more cost-effective than any off the shelf material.
Green Glue vs. Soundboard

Results:
Using soundboard in a 2x4 delivers excellent high frequency performance, but only slight gains at lower frequencies. As a result, Green Glue substantially outperforms soundboard.
Green Glue vs. Factory Damped Drywall - Steel Studs

Results:
Green Glue easily outperforms these 2 types of factory-damped drywall, especially at low frequencies. The thinner laminated products weigh less than an assembly of 2 layers of normal drywall with Green Glue. This extra weight combined with Green Glue’s excellent damping performance account for the difference.
Green Glue vs. Mass Loaded Vinyl

Results:
Mass loaded vinyl can improve wall performance, but performance is much lower than Green Glue, especially at low frequencies. Green Glue is also lower in cost and much faster to apply than MLV. While hanging MLV limply is a common recommendation, using it as the center of asandwich performs better here.