
JVC Projector Calibration Case Study
Not a comprehensive calibration guide -- unless you have a JVC RS500 or similar model.
CONTENTS
Here is what to expect from this post:
I. HISTORY (you can skip this unless you want to know where I am coming from)
II. EXPLANATION OF CALIBRATION (you can skip this if you understand why calibration is useful / what it is)
III. PROCESS (particular to my gear, not intended to be a guide to all displays, all meters, and all software; in this case, I am using JVC Autocal to get most of the way there, with a couple of hacks that allow alternate/better meters and or profiled meters to be used -- and then checking it and possible adjusting the results via manual controls on the JVC and the free calibration software called HCFR)
I. HISTORY (you can skip this unless you want to know where I am coming from)
These are the kinds of details I wish I understood when starting my calibration journey. Consider this a letter I’d write to a younger me. I’ll continue to update this. I started this journey more than 25 years ago first with the Video Essentials laserdisc, and then with a cheap kit bought online with actual gel filters one would place over a light meter. I’m glad things have moved onto better tool availability and more people sharing their knowledge. I never became an expert, but am still eager to learn more. I’ve had umr, Chad b, and Dnice in my home over years to calibrate one or another of my displays. I don’t pretend I’ll reach their level of skill. But if I can do well enough to keep myself happy, that will be a fine victory.
II. EXPLANATION OF CALIBRATION (you can skip this if you understand why calibration is useful / what it is)
Calibration is “necessary” for displays to show the content as the original creator of the content saw it while they were creating it. That is, if an object was bright green when the movie was edited and released, it SHOULD be that same bright green color when you watch the movie. In recent years, many flat panel displays have offered something akin to (and sometimes called) a “filmmaker mode” which can do a pretty decent job of matching the industry standards for how an image should be displayed if you seek an accurate image (ie, what the filmmaker saw and intends you to see). But front projection systems by their very nature are still quite variable in how their factory settings treat the image they project — especially with the wide variety of room types, screen sizes, and even screen materials. So adjusting a projector for image accuracy is still a useful thing if accuracy is what you seek. I do.
Imaging science is a vast and deep topic, so I will approach it from the standpoint of practicality: What can be measured and adjusted on my particular projector with the tools I have available. This is not intended to be a compendium of all possible ways to get an accurate image. The key aspect of an image that I’ll be calibrating for are:
The level of black and of peak white.
Color temperature, or, more broadly, Grayscale, which is how “neutral” is gray at every point from black gray to a middle gray to a white gray (and all points in between) and the White Point.
Gamma (or more generally, EOTF, when discussing HDR), or how visible shadow details are, how bright midtones are, measured against the industry standards of how they should look.
Color space — or how well display renders the defined subset of visible colors the video standard tries to accurately record and play back.
The level of black and of peak white
While in the old days we used a test pattern with very dark bars and used the Brightness control on the display to make sure that only some of the bars were visible — and while we can still look at that pattern to detect gross problems — these days with digital displays, the process is a little different.
First, just like the old days, it can take up to a half hour in a dark room to be fully sensitive to low level light details.
Second, once that is achieved, I simply pull up a test pattern of 0% gray (ie, 100% black) and turn the Brightness control down until it no longer make the image darker. Then I back up one step, which ostensibly is the darkest the display can get. Black level is now set.
What about the gray bars on the old test pattern? How well one can see low level shadow detail is more a function of gamma than this coarse Brightness control.
Peak white is set for SDR by displaying a 100% white pattern, and adjusting the projector's lamp/laser power and or the iris until white measures about 15ftl. (For HDR, folks typically just go for max peak white, but it should ideally be at least 30ftl for the full effect akin to a Dolby Cinema, even though the vast majority of the screen when showing HDR will have the same luminance as SDR....ie, its primarily the specular highlights that exceed the SDR range.)
Grayscale
This is very closely related to Color of White, and Color Temperature.
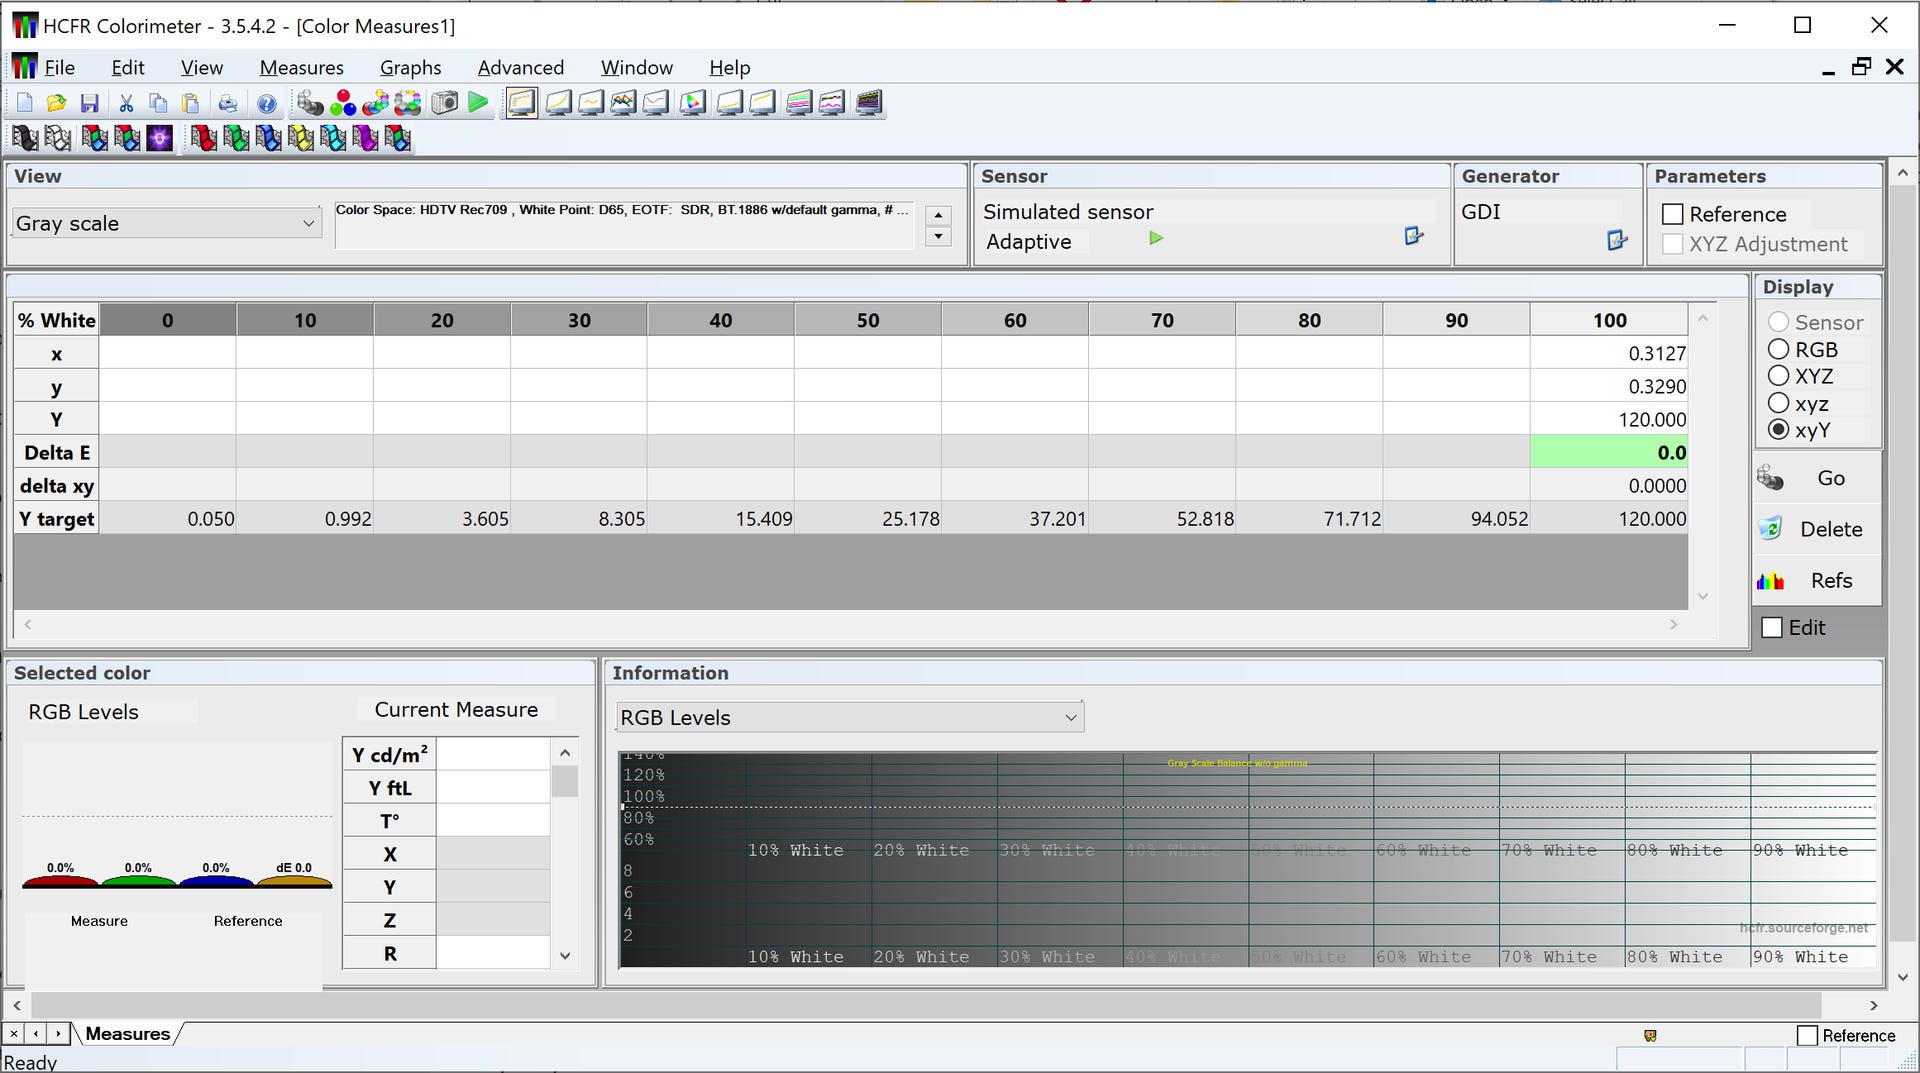
Typically, the process involves projecting test patterns of different levels of gray (typically one pattern for 10% gray, one for 20% gray, etc, all the way to 100% which is white, though one can go in smaller increments to check on details close to black and white), and measuring each pattern with the light meter. I use the i1 Display Pro (otherwise known as the i1 Display Pro) for this because it tends to have more accurate color sensors than the Spyder 5 that I also have. HCFR (just like most calibration programs) then shows how closely each primary color (red, green, blue) is to the correct ratio/balance/amount in each gray test pattern at each level of brightness.

This screen shot shows the results of such a measurement after a considerable amount of adjustment to the controls in the JVC that impact Grayscale. The JVC only offers Offset and Gain controls for each primary color (listed under Color Temperature, not Grayscale!) which means you can only adjust red green and blue at approx 20% and 80% points, even though you can measure in much more detail. So some iteration and experimentation is necessary.
To avoid limiting light output unnecessarily, I try to leave at least one Gain at 100% and adjust the others to get in line with it, if possible.
Gamma
While it is possible that getting the Grayscale dialed in can result in quite good gamma, additional optimization can be done. Some people suggest doing Gamma adjustment before working on the color of white and grayscale, which is fine (and perhaps better in some cases).
While there are ways to adjust this manually, JVC has also shared a free application with projector owners called “AutoCal” which can pretty reliably adjust gamma automatically. Now, it “only” adjusts the underlying gamma, 2.2, so if you want something else (like 2.4 or 1886, which are alternate gamma’s popular with projection systems) you still need to do a few more steps. But for now, using the Spyder 5 meter with Autocal to calibrate the gamma is a fine and solid choice since the Spyder 5 tends to be very accurate for gamma type measurements.
Note that Autocal is not useful with the newer laser based JVC projectors. Autocal uses a 100% screen filling set of patterns, but on the laser based projectors, gamma and color track differently with 10% patterns versus 100% patterns…..and 10% patterns are much more representative of real content. Why do 100% patters produce a different result? “Light Recycling.” It’s a whole topic unto itself. (It’s probably not an intentional feature but it does increase output at lower IRE levels, which is useful, if one manages it well.) TLDR, don’t use Autocal on the laser projectors. Just to a manual calibration.
The AUTOCAL program can also be used for NON automatic adjustments. It has features like the ability to create a new color space definition and upload it (sometimes necessary since, for example, my model year didn't have a REC709 color space, just something close called Normal, and there was no 2020 color space at all). AUTOCAL also lets one create/adjust gamma with a very granular tool, which is particularly useful for HDR gamma on my model year, which didn't ship with a good HDR gamma (EOTF). (There are even better tools for some of these tasks in the sense of being more granular, like the infamous Arve tool for Gamma, and Dominic Chan's excellent automation of gamma and other profile creations, which I'll discuss as needed for my process.)
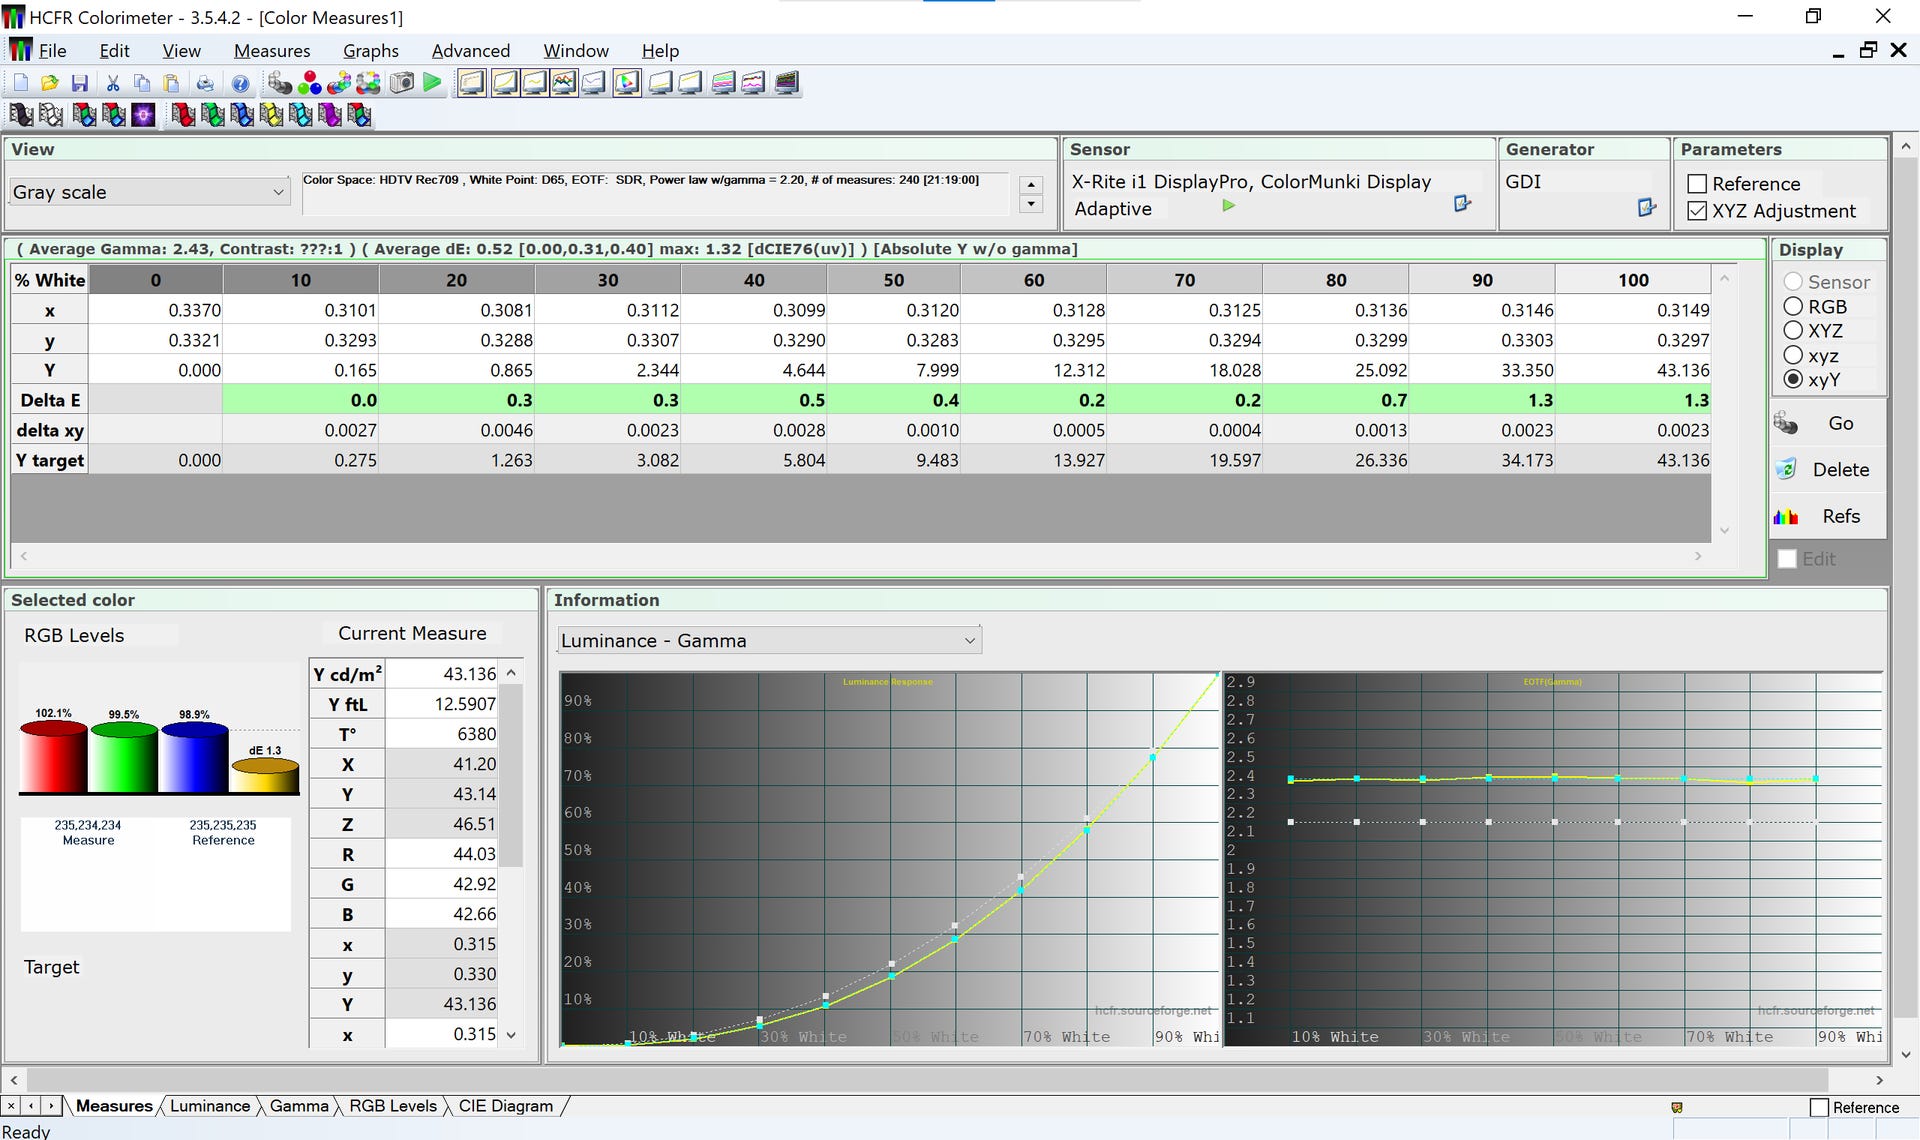
This is a screen shot of the JVC software running a calibration of the underlying Gamma.

This screenshot shows that my Grayscale calibration resulted in a decent gamma (the light blue line) compared with “reference” (the green line— which is completely covered by my white line, which is my post-Autocal gamma). Good enough for human perception.
Okay, JVC’s Autocal program can also calibrate Color Space and Color Temp. I didn’t use it that way in this instance, because the Spyder 5 is not great for color and I have the i1 Display Pro, which is better for color (and I have a correction file that makes it even better than a stock meter), but you can see that it thinks my Color Temp is 6400K at 50% gray and 6100K at 100% white……but from the prior screen shot showing the Grayscale measurements you can infer that my Color Temp is actually better than the JVC Autocal program reports. Why?
The i1 Display Pro meter used with the HCFR application to measure and adjust Grayscale is more accurate than the Spyder 5 meter used with JVC Autocal when it comes to measuring color. The Spyder tends to be great at luminance (bright and dark) measurements, so it can measure gamma well. But it is not as accurate for color.
The JVC app only supports the Spyder and not the i1 Display Pro, otherwise I’d use the i1 Display Pro with it..... But, there are hacks to enable the i1 Display Pro to work with Autocal. And there are ways when, if you have a correction file for your meter, you can also enter that into the JVC Software, to increase accuracy. I have done both and been impressed. (Details in the third section.)
Color Space
How green is green enough? Colors consist of hue (green versus red versus blue in various amounts) and saturation (how far from white they are, which you might think of as how deep or rich a color looks — think pink versus red) and luminance (literally, how bright a color is, which cannot be seen on the ubiquitous triangle color chart). And there are official standards for these three criteria for every color in a video recording/reproduction system.
Many video systems have a CMS (color management system) that lets you adjust these parameters to make the reproduction of recorded color information match the original content creator’s system/view. Most displays seem to have incomplete tools for getting this dialed in, and nearly all displays have limits to what they can reproduce, so perfection here can be hard to achieve.
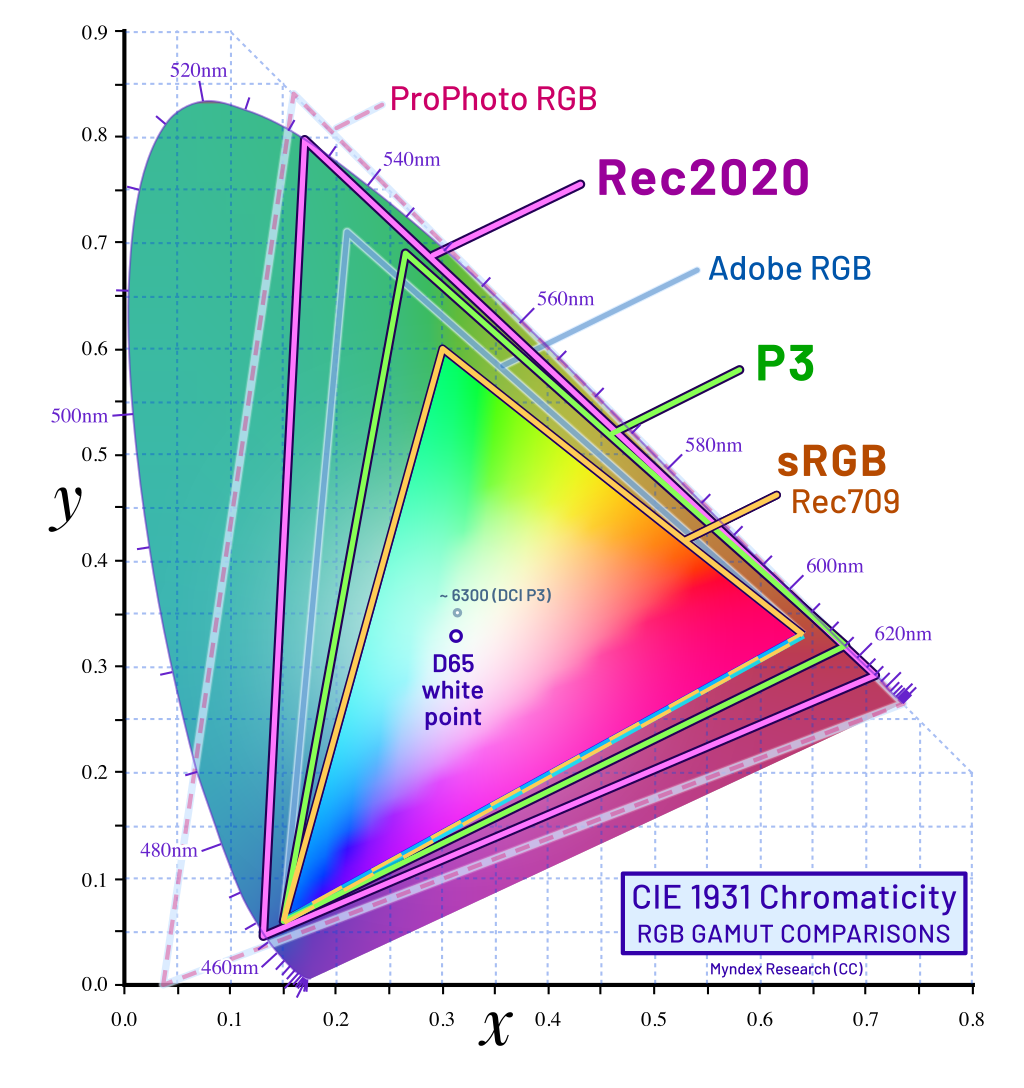
Traditional HD content (so called SDR) uses the REC709 color space. Digital Cinema uses the larger P3 color space. UHD/HDR uses the REC2020 color space though most content falls into the P3 subsection of that color space and most displays cannot display much more than P3. This diagram from Wikimedia shows the relationship of the various color spaces.
My JVC has a CMS system for both SDR (REC709) and HDR (REC2020) content — because each uses a different overall range of available colors and REC2020 on my projector uses a special filter that helps the JVC cover wider range of colors (at the cost of some light output). The SDR/709 CMS is sometimes not needed at all, because the JVC tends to track SD/709 well if one has or uploads a REC709 color profile and uses the autocal software with a good meter. The HDR CMS can improve tracking of REC2020 (mostly within the smaller P3 triangle) nicely with a few tiny adjustments, as seen in the following screen shot of my projector's tracking of color points in the P3 space within REC2020.

Anyway, that's a far from exhaustive summary of things one can calibrate on a display, but it's an introduction or overview to ground the descrioption of what I did and the results.
III. PROCESS (particular to my gear, not intended to be a guide to all displays, all meters, and all software)
The tools I will use:
My projector’s internal controls (JVC RS500 user controls)
My projector manufacturers’ software for “autocalibration” running on a Windows laptop.
A Spyder 5 light meter and a i1 Display Pro light meter (two meters aren’t required but since I have two, and their strengths differ a little, I may use both of them)
A Windows laptop running the free and quite powerful HCFR colorimetry software. (Most recent fork.)
Test patterns that can be played back on my primary video player (eg, an AppleTV) such as: https://www.avsforum.com/threads/avs-hd-709-blu-ray-mp4-calibration.948496/ for use with HCFR, to double check HCFR's internal patterns and my results.
The main steps:
1. JVC Autocal
2. Review and adjust results using HCFR
3. Final check with external patterns, measured by HCFR
Autocal
There is a different version of Autocal for each model year from JVC. But the differences are not vast from year to year in terms of functionality. There are a couple of good threads on AVS for each of the major model revisions (approx, pre 2016, the eShift models from 2016-18, and the native 4k models from 2019 forward). There are a limited number of light meters supported by each. In my model year, just the Spyder 5 is supported.
That's not great because that meter, while fine for gamma (luminance) measurements, isn't the most reliably manufactured meter when it comes to measuring color.
Using a better meter with AUTOCAL: Luckily, intrepid enthusaists have figured out how to enable other meters, such as my i1 Display Pro, to work with the JVC Autocal Software. How to use the jvc autocal program with my better light meter, with some hacks to make it compatible with the software.
And / or simply using a meter profile with AUTOCAL: Arguably even better than that, it is possible to leverage (if one has it) a "corretion file" (or profile) for one's meter, and add that data to the Autocal sofware, effectively giving the Autocal sofware a "perfect" meter to work with. This isn't an option for everyone. Whereas you can go online and buy a good meter and make use of it in Autocal with the hack mentioned above, to get your particular meter "profiled" well, it is necessary to have access to a known good meter, at the same time, and use measurements made at the same time with the same display and same patterns and same screen with them both to create a "correction" file for your meter.
It is possible to create a correction file using HCFR if you have access to a known good meter and your meter, and can set them up together against the same display you will use. HCFR provides a way to build a correction matrix: https://www.avsforum.com/forum/139-...ay-calibration-software-420.html#post59695038 The format of the resulting file is .thc and while this is a meter correction file for HCFR, you can use the data in that file to create a correction for Autocal by copying out nine numbers from HCFR and inputing them into a config init.xml file in Autocal. The only way to put a meter correction into autocal is in the init.xml file in the autocal's user documents folder. This data is in the form of a 3x3 matrix, 9 numbers, and doesn't necessarily have a specific file type.
Once I have a correction file, and it is in the right location for HCFR to find it, it will show up as an option in this screen when starting up a new HCFR session:

Directly after selecting the correction file, I can then click over to the following screen in HCFR and see numbers in this 3x3 matrix.

Mine looks like this. Don't copy this. Even if you are using a i1 Display Pro is it likely different from mine, and your projector and screen are likely different from mine.

Those numbers are what I need to enter into the init.xml in the JVC AutoCal program, so that the JVC program makes use of the meter correction data. In a simplistic sense, this makes my meter "perfectly accurate." (I use quotes around that statement because in very low light, or very high brightness situations, my meter may not have the range of the original known good meter that was used to create the correction file, etc, but this is a minor difference.)
AutoCal creates a file named “init.xml” in the “AppData directory”, ie, something like “C:Users\[username]\AppData\Roaming\JVCKENWOOD\Projector Calibration Software [edition number]" but since that is a hidden directory you have to type the whole path at least as far as "roaming" to see it.

The full init.xml file before any adjustments:
Code:
<?xml version="1.0"?>
<AppInfo xmlns:xsi="http://www.w3.org/2001/XMLSchema-instance" xmlns:xsd="http://www.w3.org/2001/XMLSchema">
  <languageType>0</languageType>
  <onFocusHelp>true</onFocusHelp>
  <onFocusName>true</onFocusName>
  <gammaCalibType>2</gammaCalibType>
  <swGamma>true</swGamma>
  <swColor>false</swColor>
  <getValType>true</getValType>
  <offsetDarkLevel>true</offsetDarkLevel>
  <colorMeasureLevel>224</colorMeasureLevel>
  <screenSize>120</screenSize>
  <viewingDistance>3.74</viewingDistance>
  <matrixOfSensor>
    <double>1</double>
    <double>0</double>
    <double>0</double>
    <double>0</double>
    <double>1</double>
    <double>0</double>
    <double>0</double>
    <double>0</double>
    <double>1</double>
  </matrixOfSensor>
  <matrixOfCalc>
    <double>1</double>
    <double>0</double>
    <double>0</double>
    <double>0</double>
    <double>1</double>
    <double>0</double>
    <double>0</double>
    <double>0</double>
    <double>1</double>
  </matrixOfCalc>
  <envMeasureType>true</envMeasureType>
  <envDark>0</envDark>
  <envBright>1</envBright>
  <trialNum>3</trialNum>
  <connectTrialNum>2</connectTrialNum>
  <timeOut>7500</timeOut>
  <IPAdrs>192.168.2.124</IPAdrs>
  <portNum>20554</portNum>
  <backupPath>C:\Users\nathan\OneDrive\Documents</backupPath>
  <serialNum>
    <string>-1704022</string>
    <string>-</string>
    <string>-</string>
    <string>-</string>
    <string>-</string>
    <string>-</string>
    <string>-</string>
    <string>-</string>
    <string>-</string>
    <string>-</string>
  </serialNum>
  <currentNum>0</currentNum>
  <onInitCalibData>
    <boolean>false</boolean>
    <boolean>true</boolean>
    <boolean>true</boolean>
    <boolean>true</boolean>
    <boolean>true</boolean>
    <boolean>true</boolean>
    <boolean>true</boolean>
    <boolean>true</boolean>
    <boolean>true</boolean>
    <boolean>true</boolean>
  </onInitCalibData>
  <strA />
  <strB />
  <strC />
  <flagA>false</flagA>
  <flagB>false</flagB>
  <flagC>false</flagC>
  <numberA>2</numberA>
  <numberB>0</numberB>
  <numberC>0</numberC>
  <numberfA>0</numberfA>
  <numberfB>0</numberfB>
  <numberfC>0</numberfC>
</AppInfo>
In the init.xlm file there is a section like the one below:
Code:
<matrixOfSensor>
<double>1</double>
<double>0</double>
<double>0</double>
<double>0</double>
<double>1</double>
<double>0</double>
<double>0</double>
<double>0</double>
<double>1</double>
</matrixOfSensor>
This corresponds to the matrix I created above in HCFR from the correction file, in this order:
1, 0, 0,
0, 1, 0
0, 0, 1
So I replace all those 1s and 0's in the XML file with my values from the screen shot in HCFR and save the xml file over the one in the JVC Autocal directory.
In other words, my readout in HCFR says:

So my updates to that section I just mentioned the XML file in the JVC Autocal director to look like:
<matrixOfSensor>
<double>1.095051</double>
<double>-0.021493</double>
<double>-0.006834</double>
<double>0.006216</double>
<double>1.043444</double>
<double>0.001442</double>
<double>0.009548</double>
<double>0.006762</double>
<double>1.044695</double>
</matrixOfSensor>
And now Autocal uses the correction file for my particular meter/projector/screen!
I had two additional complications:
1. I have two version of Autocal. One is the original JVC version, which can only support my Spyder 5, which is not profiled and I don't have a correction for. The other version of Autocal is the modified one that can use my i1 Display Pro, and that's the one I have a correction file for. But there is only one init.xml file....it is shared between all installs of Autocal. So I have to be care to revise the XML file if I change which meter&Autocal app I am using.
2. I have two different correction files. One is for REC2020 and one is for REC709 (or rather, one is for use with the color filter in the JVC active, and one is for when the color filter is not active). So I ALSO need to be sure to revise the XML file with the right correction data for the different color filter states in the JVC. Alas, this is the "price" of having exact correction data available for my meter.
Color Profiles: Things may be better with more recent models, but in my model year, the projectors from JVC shipped without a perfect REC709 color gamut profile. Luckily the AUTOCAL app makes it pretty easy to create one, and upload it. The data values are all defined in industry docs so you don't need to guess. Note that it is NOT considered a best practice to create a profile with a default gamma of anything other than 2.2 (which is the basis for Normal in most discussions and processes) but I didn't know that when I created my profile.
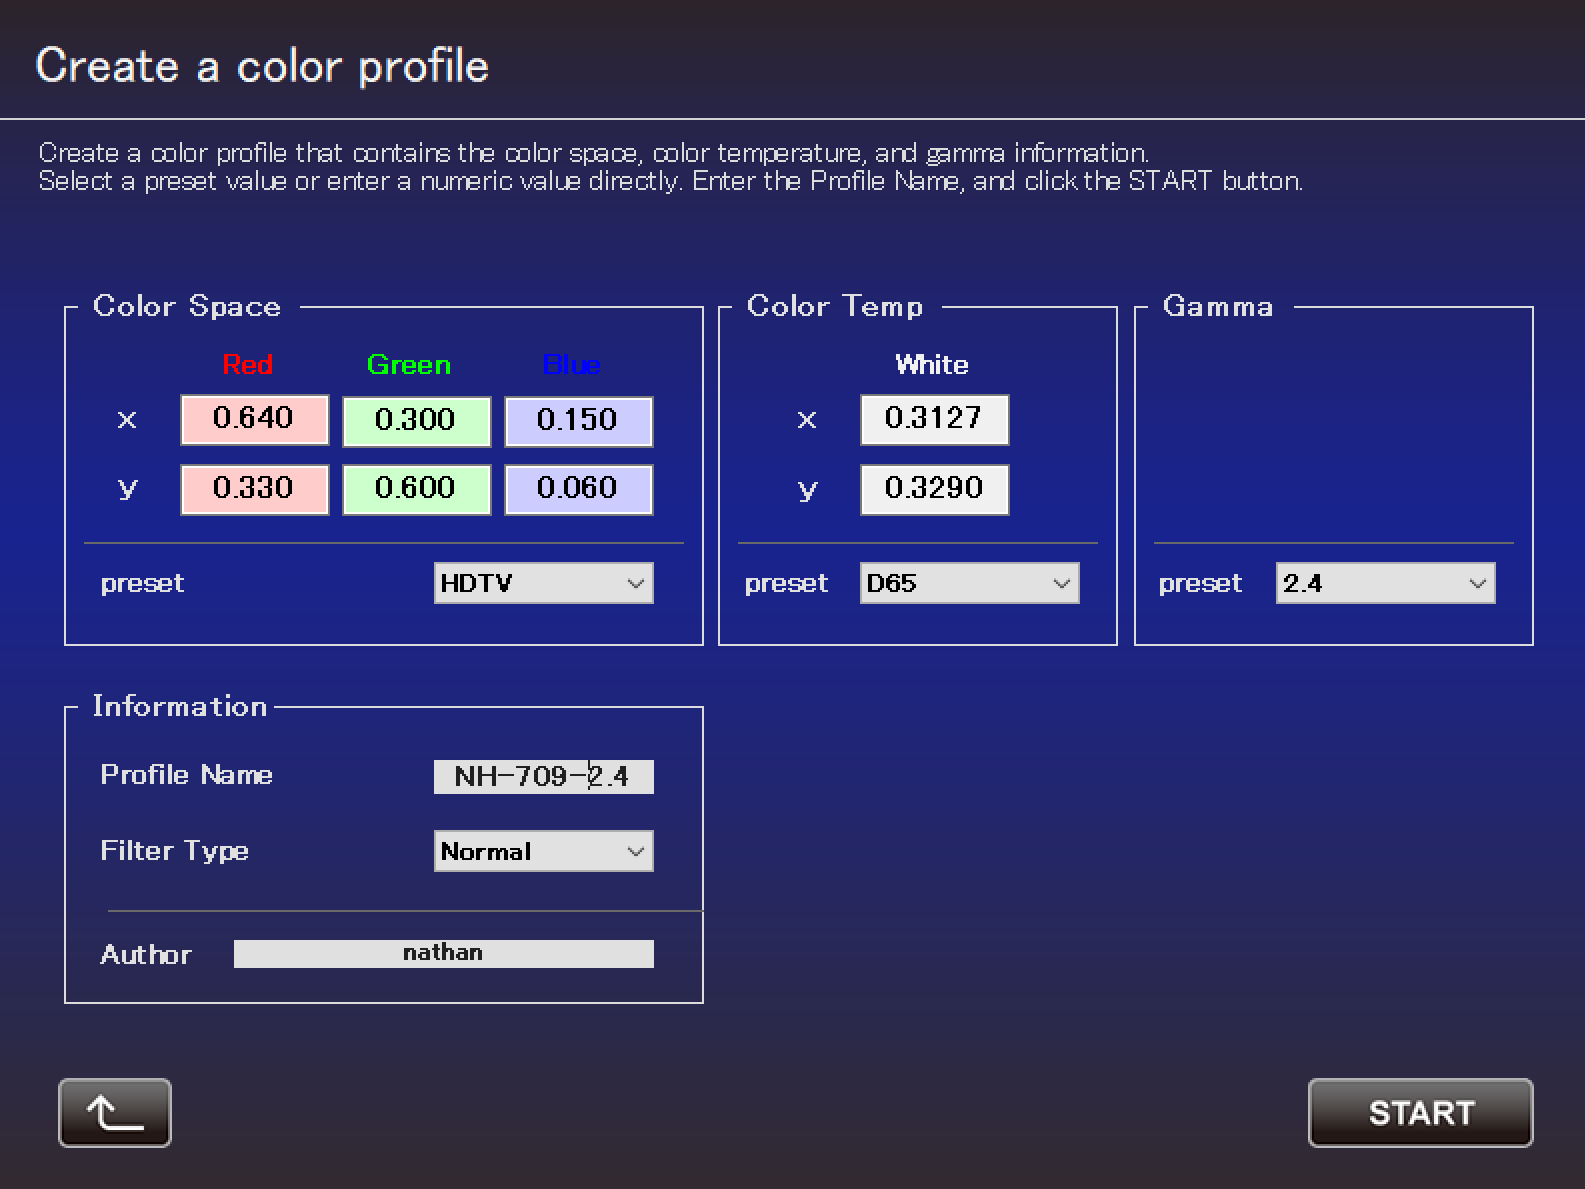
Anyway, one clicks START and the app quickly creates a profile file in your documents fold. Then, on the main screen of the Autocal app, one can use the Import/Export screen to import this profile into one of the Custom slots in the projector's memory.
Running AutoCal: Regardless of what meter I am using (as long as it is actually accessible by ) and whether it has a correction file, the steps in running Autocal are pretty standard. It is important to have a 1080p source playing into the projector, regardless of whether you are doing Autocal for 4k or not.
AUTOCAL Concepts
GAMMA:
when using autocal do it with GAMMA on NORMAL and IRIS on MANUAL (some people say to open the IRIS fully when running the gamma calc since it gives the meter an easier time reading the gamma; if you do that then do NOT leave the IRIS like that for color gamma autocal unless you watch things that way).
just do one run for with the filter and one run without the filter (and on each lamp mode if you will use both lamp modes). Those two (or four) runs cover gamma for all combinations of projector settings on my model year.
COLOR: when doing color you need to do them for each combination of the following if you want to cover every configuration. I do not. I only use a subset of these so I focus on that subset.
Lamp Power
Filter setting
And four iris settings(0, ‐4, ‐8, ‐12) since each is a different saved baseline zone (or 0 5 10 15 may be easier to remember and it just as good since each one falls in a different range)
CMD setting
(I heave read that Gamma calibrations can only be done on "built in" colour profiles, not imported ones. I haven’t encountered this yes. If so, then those of us who have the RS500 generation would be in trouble because they didn't ship with a REC2020 profile! But, again, I haven't seen this in actual use. To be safe I suppose one could use ANY profile with a FILTER and be okay.)
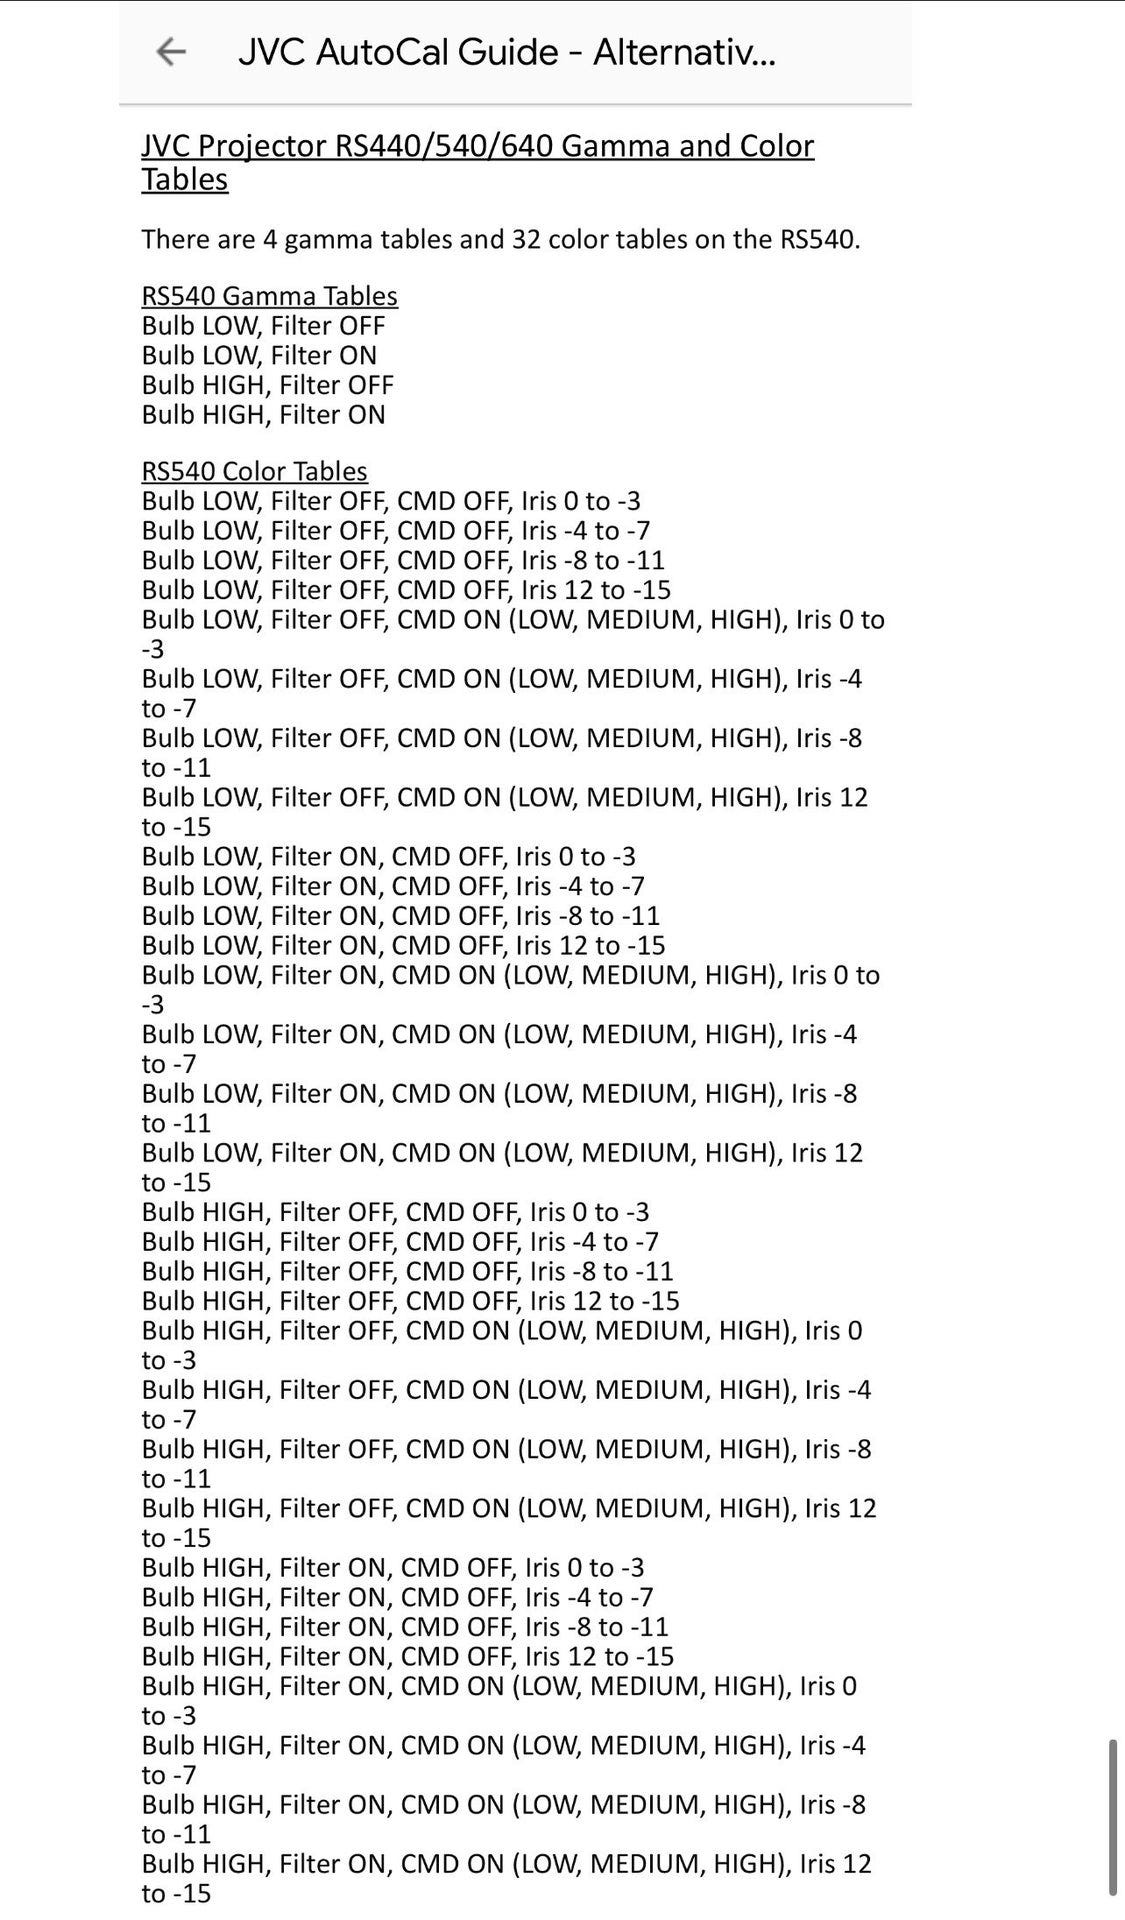
Here is a list a fellow AVS user posted actually delineating all the different permutations. As I said, I don't Autocal for all of these because there are some combinations I will never use (eg, those with CMD).
Checking and Fine Tuning
Frankly Autocal does a very good job with SDR709 setup. Chances are very good if you measure your projector in the same mode you autocal-ed, the dE between what Autocal did and what you read in HCFR with the same meter (and same correction file, if you are using one) is going to average less than 1 in almost all ways.
But if you are like me, you'll do it anyway.
Set "Range" to Standard, not Auto, in the JVC, to prevent any weirdness.
Choose the 2.2 Gamma preset assuming your profile uses that.
Choose the color space and iris setting for SDR709 you used in autocal.
Measure in HCFR or similar tool
First, review how the basic concepts of calibration work, if you have forgotten how to read and understand calibration results (and why or how you might consider adjusting them). A very nice summary: https://www.avsforum.com/threads/ba...ms-updated-and-enhanced.852536/#post-10632798
Second, set up HCFR correctly and run it.
Choose to use the internal or automatic patterns. Yes, these require you to take a couple steps to make sure they are being correctly displayed but it is SO MUCH faster, and very reliable once set up right.

Then, choose your meter. Hopefully you have a .thc file (meter correction) for your meter made with a better device. But if not, do not dispair, you can still get close with a decent meter (arguably within the realm of imperceptible differences from perfect) anyway.
If you have successfully uploaded a correction filter you will NOT see all 1 and zeros here:
But, again, if you dont have a correction file, that's okay. Choose "Projector" for display type when prompted.
Then, you will need to make sure the Test Patterns are going to be generated in the right way. Under Measures -> Display you can choose where the patterns appear (Target screen) if you have more than one screen and in particular if you are using an extended desktop do you can put the patterns on your projector and keep the HCFR main interface visible on your laptop at the same time. (This is useful for real time adjustments.)
I prefer an Image Area of 100% (which for a projector seems to work fine; for flat panel TV's is usually not what to choose.)
And ultimately I prefere GDI fullscreen though this can be a little tricky on my old Windows laptop.
Finally, and perhaps most important, GDI Options lets you choose whether to send video or computer level signals to your projector. There are many ways to slice this, but the most accurate is to make sure your computer GPU is set to output "full range" (0-255) already, which is what it natively wants to do, and then select 16-235 on this screen, to output video levels to your projetor (which is probably getting video level ranges from all other inputs as well like Blu Ray players, and streamers).

If you are using a dual screen extended desktop, you'll need to make sure the patterns are showing up on the projector and not on your computer screen. My computer is finiky about this. I have to choose "Floating Window" patterns, run a grayscale measure or two, and then move the window to the projector display, andthen choose 'full screen' again, to get the right patterns to display on the projector.
Then double check your preferences. This is the preferences tab for assessing SDR gamma and REC709 color (ie, HDTV, Blu-Ray Disk, and so on).
Under Preferences -> References -> Color Space choose HDTV REC 709 and don't change any of the defaults.
Under Gamma Calculation (SDR) I prefer Display Gamma (black compensation) but (power law) works well too, and it what I have selected here.
I choose Power Law Gamma value of 2.2 to match when JVC Autocal has generated as my base curve, as long as that is also what my Profile and setup in JVC is set at, as well.
And that's it.

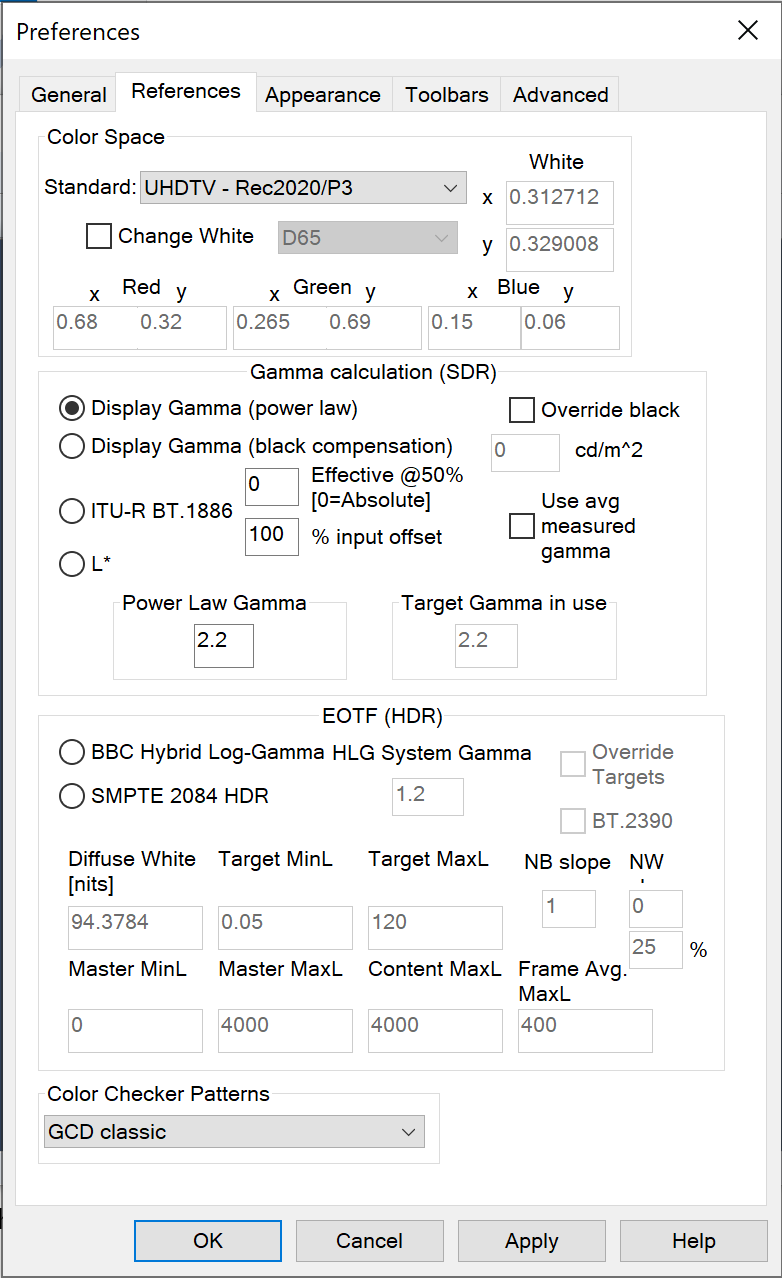
Contrast that with the following setup, which is for measuring REC2020 color. In this case I am onlyinterested in the color space, which is why I left the gamma in SDR gamma. (I'll do that on the projector too, invoke the REC2020 color space -- wide, color filter engaged, are other words for it -- and leave gamma at 2.2.) Notice that I use the UHDTV REC2020/P3 standard and not the simple REC2020 standard option. That way, HCFR knows to track four color points for each color all within the P3 area inside of REC2020. This is the only area that the JVC can cover, so I want to see the tracking there, and don't care to see one or two points outside that looking horrible, and end up with only 3 or even just 2 points within the P3 area that I can look at.
You may need access to additional patterns you can run to see details for color tracking. To do this use the View menu to enable teh Extended measures and Saturation measures toolbars.

Then you can run "all the measurements" using the 5th icone from the left on the Extended measures toolbar.
Chance are good, your HCFR run, to validate your AutoCal setup, using the same Sensor (color meter) and (if you have it) the same correction file, you'll get results like this:

Could you tweak these results a bit? Sure, I'd be tempted to see if I could improve the color tracking of red a little. Of course, the most important tracking is close to the center/white, so trying to improve the 50% point might damage the 25% point....and the 75% point is going to be a lost cause, I'd guess, though who knows. Getting 25% to be perfect might notable improve 50% and nudge 75% nicely towards being correct.
(Editor's Note: I really thought, when I started this post, the bulk of the content would be here, about how to use HCFR to measure and adjust the JVC. But, along the way, I learned just how good the AutoCal tool is, especially now that one can use much better meters with it AND since one can use meter profiling/correction files with it. That essentially means that AutoCal gets one into the realm of undetectable errors -- dE of 1 or less, in fact, which is better than undetectable -- in most cases. That being the case, I may do an update with "how to use HCFR" at some point but this post is complete, without that.)
If it looks very very close and you want to make it even closer (but maybe not better): Adjust gamma (using the JVC Autocal tool on the computer), then grayscale (via the user controls in the projector), then color space (gamut) coverage (using the CMS in the user controls on the projector).
However, if it deviates notably from being very good when you first review the results in HCFR, pause and retrace your steps. Maybe you made an error in the Autocal process, or (more likely in my experience) maybe a setting in HCFR is incorrectly set.
Okay, so maybe you are really obsessive, and want to check whether HDR2020 looks good, too. It probably does. Or, I should say, the REC2020 tracking is probably as good as it can get with the meter (and, if you have one, correction file) you have. The HDR part (gamma, or EOTF) is a little bit of a different matter. Yes, Autocal will have dialed in the perfect underlying gamma for when the wide color filter is in use. So any curve you pull up will be as perfect as that. But whether you have a perfect curve to lay on top of that is going to be a subject for a different post. Suffice to say, other than this first hear of JVC HDR compatible projectors with their dreaded Gamma D for HDR, there exists in all future JVCs an adequate HDR gamma/EOTF, and there are ways to create even better curves.
Anyway, the process to check the REC2020 color space is the same as the REC709 color space.
To check REC2020, put the projector into rec2020 mode (ie, a color profile that uses REC2020 color space/the wide filter) and put HCFR into REC2020P3 mode.
(You can also check HDR gamma: put the projector into HDR gamma if you have one, and HCFR into HDR mode.)
Run HCFR and review the results.
Now, to be extra OCD, I also tried running HCFR with external test patterns, in my case the AVSHD disk/images available for free on AVS Forum, and playing them back on my AppleTV. And it all checked out without a normal margin of tiny variation.
Closing Thoughts
I was able to get good results using a profiled meter with the autocal software. But there are other tools that let one go even further. If you are curious, check out:
Uploading a 1DLUT to a JVC projector
HCFR Users - Automatic Greyscale Calibration and Custom...
This is particularly useful to keep in mind because AutoCal on the laser based JVC projectors uses a 100% pattern for measurement, which is less accurate on those models than using a 10% pattern, due to the “light recycling” on those units…. making Autocal far less accurate. On the laser projectors, doing a manual calibration without using Autocal makes more sense.
Many of the less expensive meters have trouble measuring off the screen in the lower IRE patterns….which makes tracking gamma well out of black difficult. (It also makes measuring contrast tough.)
The solution:
Do most of the calibration with the diffusion filter on the meter and with the meter facing the projector.
Place the meter so that its shadow is in the centre of the screen, with the diffuser aimed at the projector lens.
The distance should be adjusted that the white pattern reads around 4000-4500 lux.
Then, as a final step, adjust the white point in the old fashion manner, with the meter (without diffusion filter) facing the screen.
A quick note about the 4k models.
There is no "SDR calibration" and no "HDR calibration" with AUTOCAL. You are just calibrating the underlying gamma/EOTF and Color tracking and grayscale/color temp for EVERYTHING. The JVC mathematically transforms those underlying calibrations to whatever you choose for your final playback.
So, to calibrate HDR and SDR and everything else with a laser 4k model:
For gamma: The (wide) color filter being on or off does matter, so run it both ways if you use it both ways. (The iris position does not matter and the laser power setting does not matter.)
For color: Use the 4 aperture steps (aperture groupings (0-3, 4-7, 8-11, 12-15), and run it with the filter on and off, if you use all those when playing back content. (Laser power does not matter as it runs through them all during the color calibration process.)
---
If you are using a lamp based 4k model, then the two different lamp powers will increase your permutations, since it doubles the number of runs of gamma and color that you need to run, if you are using both lamp powers.